Applies to: Exchange Server SE / 2019 / 2016 / 2013
Exchange Server creates a self-signed certificate during setup. Its friendly name is normally Microsoft Exchange, and its subject is the Exchange server name. For example, if the server name is EX1901, the certificate subject is CN=EX1901.
Normally, you do not need to touch this certificate. But if it is removed, or if the Exchange Back End HTTPS binding loses the certificate, OWA, ECP, ActiveSync, and Exchange Management Shell can be affected.
Microsoft documents this problem and uses New-ExchangeCertificate to create a replacement certificate. One of the possible symptoms is that Exchange Management Shell itself cannot connect. This post shows a practical recovery path when EMS is not available. Microsoft’s recovery article is scoped to Exchange Server 2013 and 2016; the same Exchange Back End port 444 failure pattern was reproduced here on Exchange Server 2019.
In This Article
- 1. What Is the Microsoft Exchange Self-Signed Certificate?
- 2. Why This Certificate Matters
- 3. Troubleshooting: Check These First
- 4. Create a New Microsoft Exchange Self-Signed Certificate Without EMS
- 5. Assign the New Certificate to Exchange Back End Port 444
- 6. Validate Exchange Management Shell
- 7. Check the Certificate Configuration After Recovery
- 8. Key Takeaways
1. What Is the Microsoft Exchange Self-Signed Certificate?
Exchange Setup creates the Microsoft Exchange self-signed certificate automatically. On Exchange Server 2016 and 2019, Microsoft documents the default certificate with a subject based on the server name, a five-year lifetime, and the Exchange services IMAP, POP, IIS, and SMTP.
Subject:       CN=<ExchangeServerName>
Friendly Name: Microsoft Exchange
Services:      IMAP, POP, IIS, SMTP
For example:
Subject:       CN=EX1901
Friendly Name: Microsoft Exchange
This is not the Microsoft Exchange Server Auth Certificate. The Auth Certificate is a different certificate used for server-to-server authentication and OAuth. For Auth Certificate validation, rotation, and recovery scenarios, see Exchange Server Auth Certificate Field Guide: Validation, Rotation, Recovery, and Time Zone Issues. If your issue is Get-ExchangeCertificate returning blank while the Auth Certificate is valid, see Get-ExchangeCertificate Returns Blank with a Valid Auth Certificate.
2. Why This Certificate Matters
One important use of the Microsoft Exchange self-signed certificate is the Exchange Back End website in IIS. Exchange Setup binds this certificate to HTTPS port 444.
Client connections normally reach the Default Web Site first. Exchange then proxies these requests to the Exchange Back End website over port 444. So this certificate is part of the internal communication between the Exchange frontend and backend IIS websites.
This certificate is not only used by IIS. Exchange also uses the default Microsoft Exchange certificate for internal communication between Exchange servers and for internal SMTP encryption.
If this certificate is missing, or the port 444 binding is broken, several problems may occur:
- OWA and ECP may show a blank page.
- Exchange ActiveSync users may stop receiving email.
- Exchange Management Shell may fail to connect.
- Event Viewer may show SSL errors for
0.0.0.0:444.
So if OWA, ECP, ActiveSync, or EMS suddenly starts failing, Exchange Back End port 444 and the Microsoft Exchange self-signed certificate are worth checking.
3. Troubleshooting: Check These First
If EMS fails with PSSessionOpenFailed together with the symptoms above, check the backend HTTPS path before trying Exchange certificate cmdlets.
A typical EMS symptom is:
New-PSSession : [ex1901.lab19.local] Connecting to remote server
ex1901.lab19.local failed...

FullyQualifiedErrorId : -2144108477,PSSessionOpenFailed

Failed to connect to an Exchange server in the current site.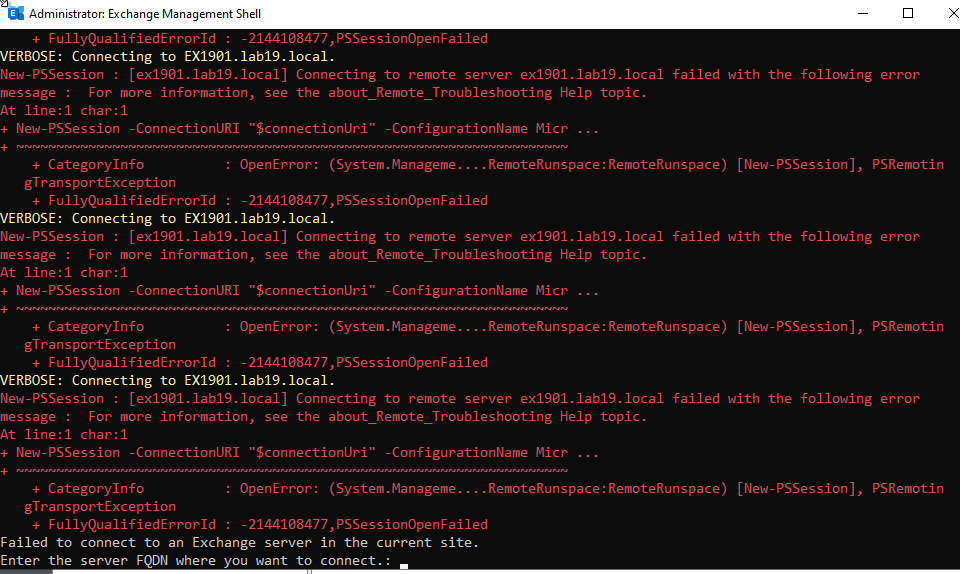
3.1 Check Event Viewer
Open:
Event Viewer
Windows Logs
System
Look for HttpEvent errors. In this case, the useful event was:
Source: HttpEvent
Event ID: 15021

An error occurred while using SSL configuration for endpoint 0.0.0.0:444.
The error status code is contained within the returned data.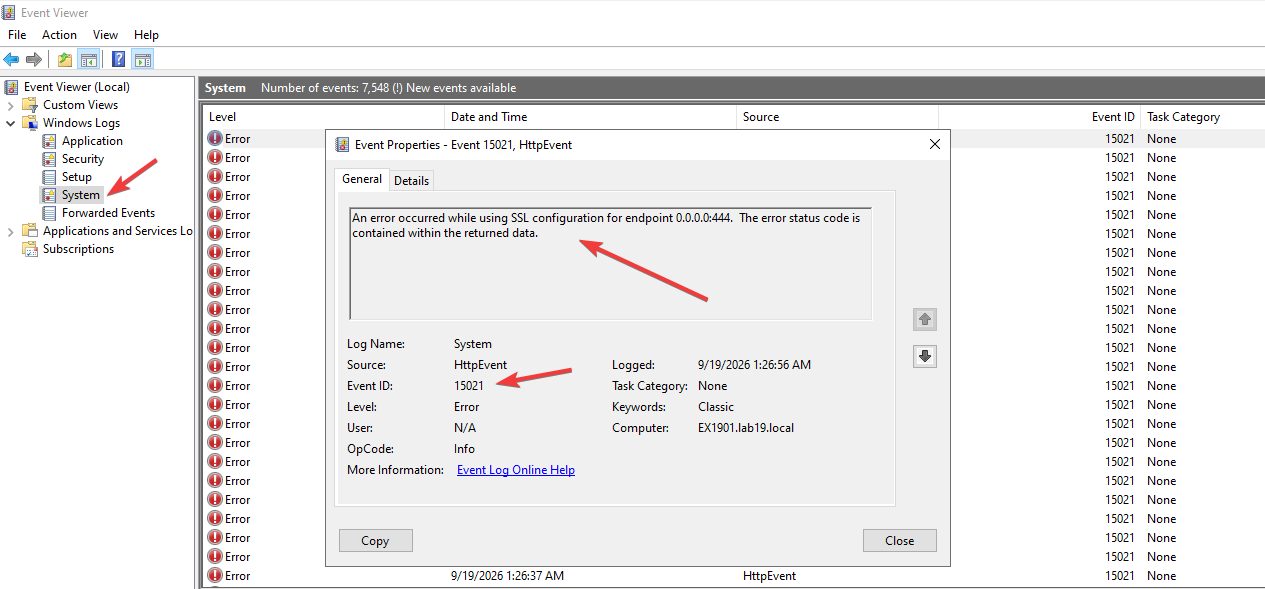
The important clue is 0.0.0.0:444. That points to the Exchange Back End HTTPS binding.
3.2 Check the Local Computer Certificate Store
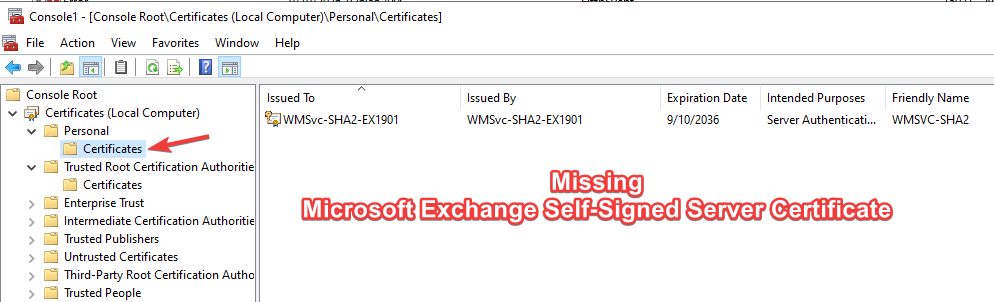
Open certlm.msc and check:
Certificates (Local Computer)
Personal
Certificates
Look for the certificate with the friendly name Microsoft Exchange. Its subject normally matches the Exchange server name.
3.3 Check Exchange Back End Port 444
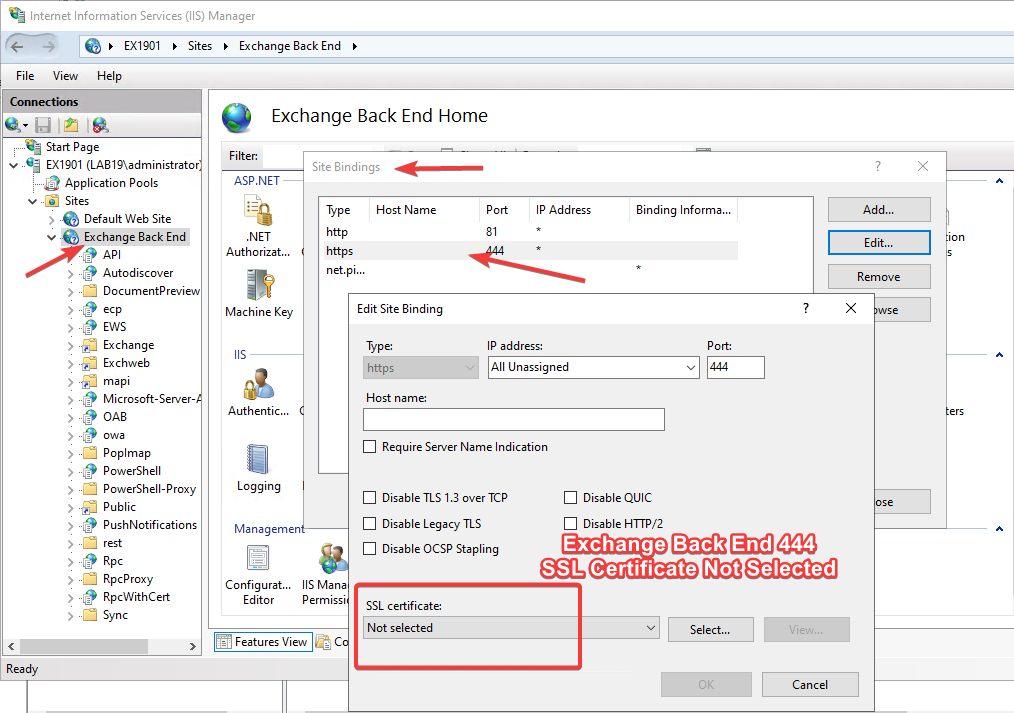
Open IIS Manager and go to:
Sites
Exchange Back End
Bindings
https
Port 444
If the SSL certificate field shows Not selected, the backend HTTPS binding is broken.
If these checks point to the missing Microsoft Exchange certificate or an empty port 444 binding, continue with the recovery steps below.
4. Create a New Microsoft Exchange Self-Signed Certificate Without EMS
If EMS cannot connect, open a normal elevated Windows PowerShell session and create a new self-signed certificate with the Exchange server name and FQDN.
$Cert = New-SelfSignedCertificate `
    -DnsName "EX1901","EX1901.lab19.local" `
    -CertStoreLocation "Cert:\LocalMachine\My" `
    -FriendlyName "Microsoft Exchange" `
    -KeyAlgorithm RSA `
    -KeyLength 2048 `
    -HashAlgorithm SHA256 `
    -KeyExportPolicy Exportable `
    -NotAfter (Get-Date).AddYears(5)

$Cert | fl Subject,Thumbprint,NotBefore,NotAfter,HasPrivateKey,FriendlyNameSubject : CN=EX1901
Thumbprint : 2E3C0FFFB6549D651BE22AF7D340F81CAC089E8A
HasPrivateKey : True
FriendlyName : Microsoft Exchange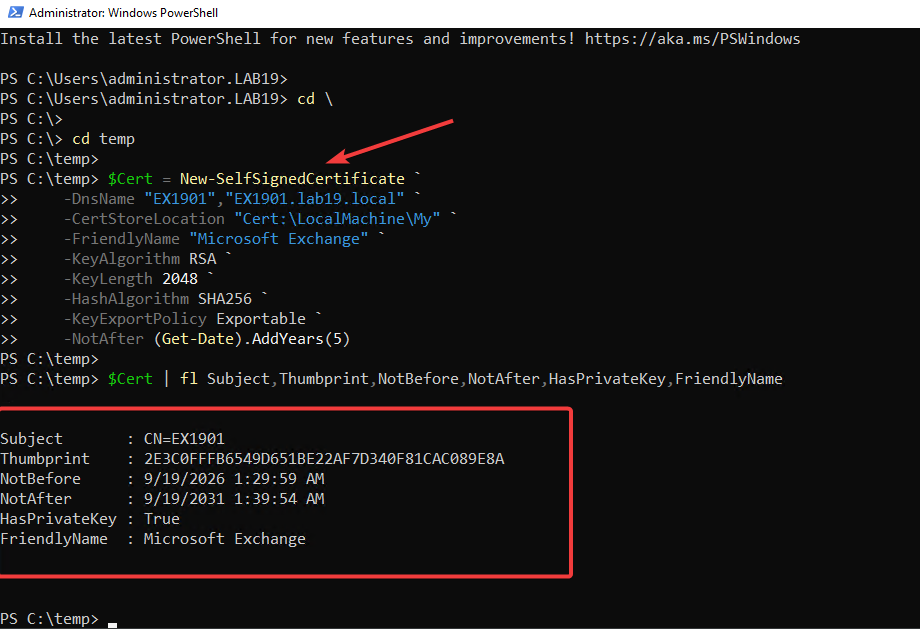
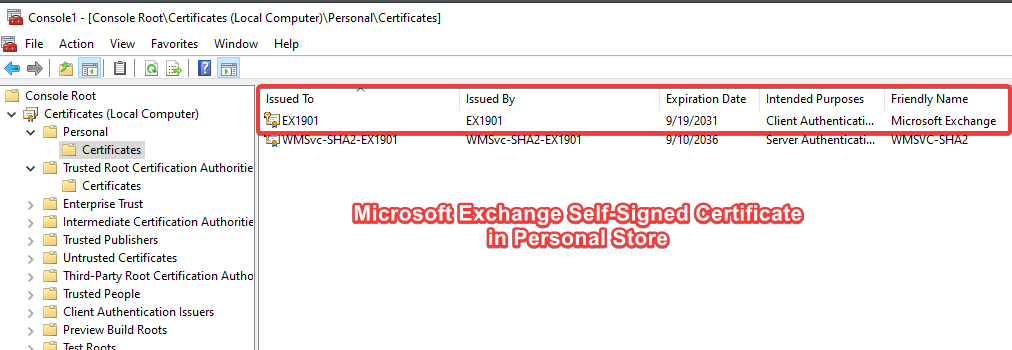
Confirm that the new certificate is present under Certificates (Local Computer) > Personal > Certificates.
Optional: The newly created certificate can also be copied to the Trusted Root Certification Authorities store. This was part of the tested recovery, but Microsoft does not list it as a required step.
Export-Certificate `
    -Cert $Cert `
    -FilePath C:\Temp\EX1901.cer

Import-Certificate `
    -FilePath C:\Temp\EX1901.cer `
    -CertStoreLocation Cert:\LocalMachine\Root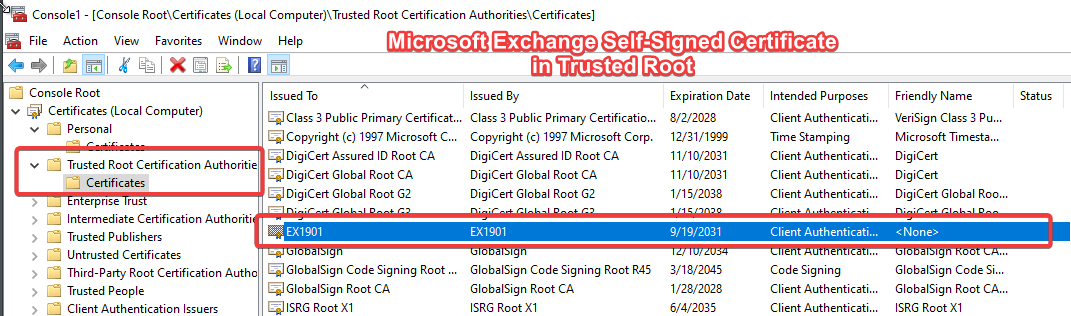
This Trusted Root step is optional for this recovery path.
5. Assign the New Certificate to Exchange Back End Port 444
Return to IIS Manager:
Sites
Exchange Back End
Bindings
https
Port 444
Select the new Microsoft Exchange certificate and save the binding.
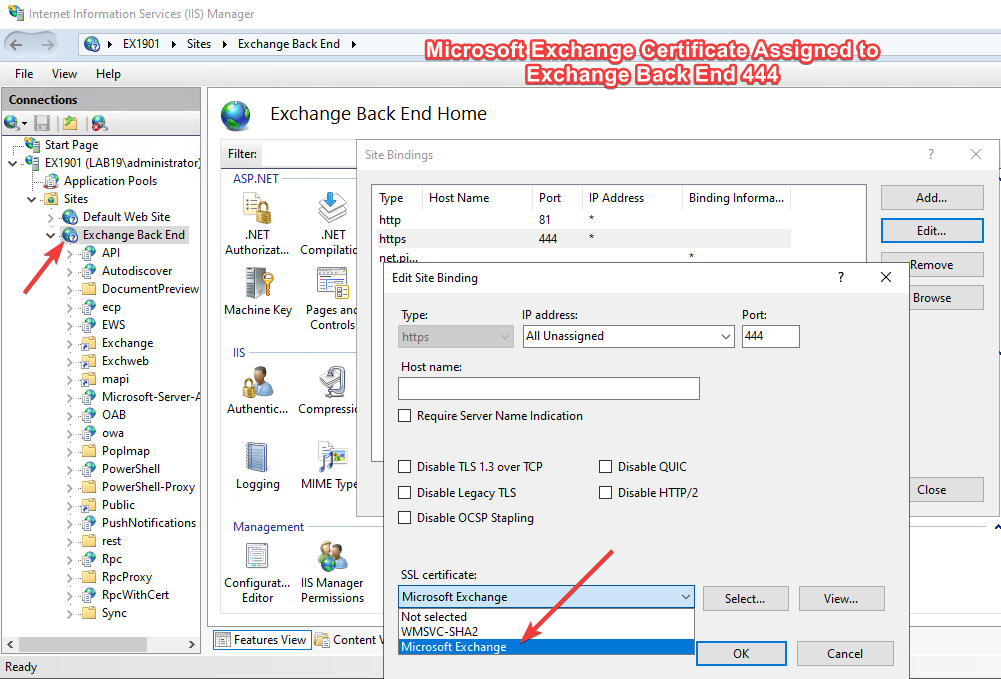
Then restart IIS:
iisresetA full server restart was not required in this case.
6. Validate Exchange Management Shell
Open a new Exchange Management Shell. The connection should complete normally.
VERBOSE: Connecting to EX1901.lab19.local.
VERBOSE: Connected to EX1901.lab19.local.
Run a simple Exchange command to confirm that the shell is working:
Get-ExchangeServer | fl Name,AdminDisplayVersion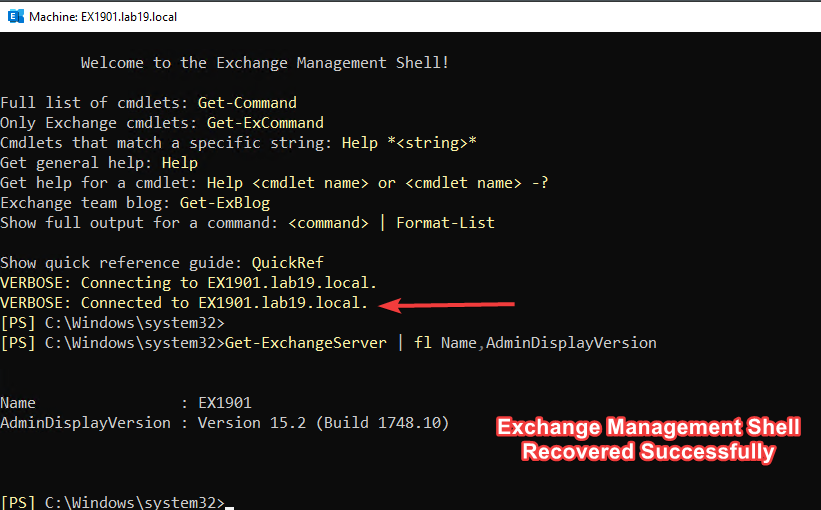
7. Check the Certificate Configuration After Recovery
Note: Exchange Setup creates the original Microsoft Exchange self-signed certificate and assigns it to IMAP, POP, IIS, and SMTP. The certificate created above with Windows PowerShell was used only to restore the Exchange Back End HTTPS binding on port 444. It does not automatically recreate the original Exchange certificate service assignments.
After EMS is working again, review the Exchange certificate configuration and verify the IIS HTTPS bindings:
- Default Web Site – HTTPS 443: verify that the intended certificate is still assigned.
- Exchange Back End – HTTPS 444: verify that the recovered Microsoft Exchange self-signed certificate is assigned.
A certificate can exist in the Local Computer certificate store while IIS is no longer using it.
8. Key Takeaways
- A missing Microsoft Exchange self-signed certificate or a broken Exchange Back End port
444binding can affect OWA, ECP, ActiveSync, and Exchange Management Shell. - If EMS cannot connect, check
HttpEvent 15021, the Local Computer certificate store, and the Exchange Back End HTTPS binding first. - If the certificate is missing, create a replacement from Windows PowerShell, assign it to Exchange Back End port
444, runiisreset, then review the remaining Exchange certificate service assignments and IIS bindings.
References
- Digital certificates and encryption in Exchange Server — Microsoft Learn
- Create a new Exchange Server self-signed certificate — Microsoft Learn
- OWA, ECP, or EMS can’t connect after removing a self-signed certificate from Exchange Back End — Microsoft Support

Cloud and infrastructure professional with nearly two decades of experience in enterprise IT environments, spanning public cloud, private cloud, and hybrid architectures.