Applies to: Exchange Server SE / 2019 / 2016
In a healthy Exchange Server environment, Exchange Server Auth Certificate renewal should normally be a straightforward process.
In the field, however, I have seen cases where this process did not go as expected.
Sometimes the certificate is still healthy. Sometimes it is close to expiration. In other cases, it is already expired, invalid, or missing from one or more Exchange servers. The correct action is not the same in every case.
Because of this, I wanted to put together a practical guide based on the Exchange Server Auth Certificate cases I see in real environments.
This guide shows how to check the current state, choose the correct path, renew or replace the certificate when needed, validate the result, and complete the required Exchange Hybrid checks afterward, if applicable.
In This Article
- 1. What Is the Exchange Server Auth Certificate?
- 2. Before You Start
- 3. Useful MonitorExchangeAuthCertificate.ps1 Parameters
- 4. How to Use This Guide
- 5. Case 1 – Healthy Exchange Server Auth Certificate
- 6. Case 2 – Valid but Expiring Exchange Server Auth Certificate
- 7. Case 3 – Expired or Invalid Exchange Server Auth Certificate
- 8. Case 4 – Missing Exchange Server Auth Certificate
- 9. Post-Check for Exchange Hybrid Configuration
- 10. Cleanup
- 11. Key Takeaways
1. What Is the Exchange Server Auth Certificate?
So, what is the Exchange Server Auth Certificate?
Microsoft also refers to it as the Exchange Server OAuth certificate in its documentation.
It is a self-signed certificate used by Exchange Server for OAuth-based server-to-server authentication.
In an on-premises Exchange Server organization, it is part of the OAuth configuration used by Exchange Server services and features.
In Exchange Hybrid, it is also used for OAuth communication between Exchange Server and Exchange Online. Features such as Free/Busy and MailTips can depend on this trust.
So if the Exchange Server Auth Certificate is expired, missing, or configured incorrectly, the impact can be more than just a certificate warning.
2. Before You Start
Download the latest MonitorExchangeAuthCertificate.ps1 script from the Microsoft CSS-Exchange project.
Run the script from one Exchange Server with the Mailbox role. The script checks the Exchange Server Auth Certificate state across all reachable Exchange servers in the organization, including servers in multiple AD Sites.
Start with validation only:
.\MonitorExchangeAuthCertificate.ps1This command does not change the configuration. It only checks the current Exchange Server Auth Certificate state.
The script writes its logs here:
<ExchangeInstallPath>\Logging\AuthCertificateMonitoringYou will see the Internal Transport Certificate checked before and after certificate changes throughout this guide because the Microsoft script can temporarily replace it during Auth Certificate creation and then restore the previous certificate.
If the previous Internal Transport Certificate is invalid, the script can create a new one instead.
Note: If the environment is Exchange Hybrid, use -IgnoreHybridConfig $true when running the script in renewal mode. If the active Exchange Server Auth Certificate is replaced, check the Exchange Hybrid configuration afterward.
3. Useful MonitorExchangeAuthCertificate.ps1 Parameters
You do not need every parameter in the script. These are the ones that are most useful during manual Exchange Server Auth Certificate work.
| Parameter | What It Does |
|---|---|
| No parameter | Validation only. Checks the current state and makes no changes. |
-ValidateAndRenewAuthCertificate $true | Performs the renewal or recovery action when required. |
-IgnoreHybridConfig $true | Allows renewal to continue when Exchange Hybrid is detected. |
-IgnoreUnreachableServers $true | Continues by checking only the Exchange servers that can be reached. |
-EnforceNewAuthCertificateCreation | Forces creation of a new certificate and stages it as the Next certificate. |
-CustomCertificateLifetimeInDays <days> | Sets the lifetime of the new certificate. The normal default is five years. |
-Confirm:$false | Runs without interactive confirmation prompts. Use with extra caution, especially during manual recovery. |
-Verbose | Shows more detail about the checks and actions performed by the script. Useful for troubleshooting and understanding why the script selected a specific action. |
-ExportAuthCertificatesAsPfx | Exports available Exchange Server Auth Certificates as password-protected PFX files. |
For normal interactive renewal:
.\MonitorExchangeAuthCertificate.ps1 `
-ValidateAndRenewAuthCertificate $trueI prefer to keep confirmation prompts enabled during manual Exchange Server Auth Certificate work.
-Confirm:$false is more suitable for planned automation after the script behavior is well understood.
-Verbose is useful during troubleshooting, but I did not use it in the screenshots to keep the output easier to read.
-EnforceNewAuthCertificateCreation is useful when you want to create a new Next certificate even if normal renewal is not yet required.
-CustomCertificateLifetimeInDays will also be important later in this guide for the TimeZoneAware recovery method used in Case 3 and Case 4.
3.1 Download MonitorExchangeAuthCertificate-TimeZoneAware.ps1
Download from GitHub | Direct Download from Here
Questions and feedback are welcome in the comments below. For script issues or feature requests, please use GitHub Issues.
4. How to Use This Guide
Always start by running the script in validation mode:
.\MonitorExchangeAuthCertificate.ps1Check the result, then continue with the case that matches your Exchange Server Auth Certificate state:
- Healthy → Case 1
- Valid but expiring → Case 2
- Expired or invalid → Case 3
- Missing → Case 4
This way, you do not make unnecessary certificate changes.
5. Case 1 – Healthy Exchange Server Auth Certificate
This is the easiest case.
The Current certificate exists, is valid, and no renewal is needed.
First, check AuthConfig:
Get-AuthConfig | fl *certificate*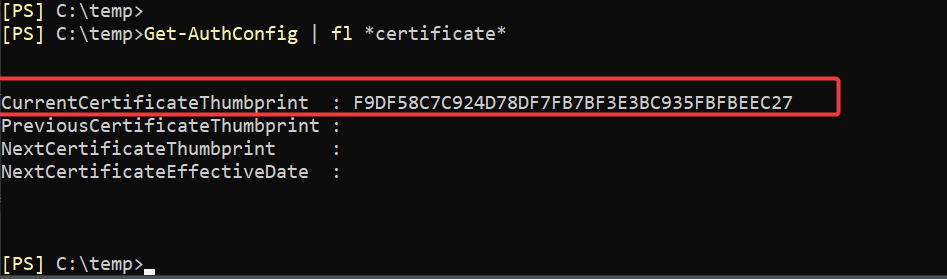
Then record the Internal Transport Certificate:
Get-TransportService | fl Name,*certificate*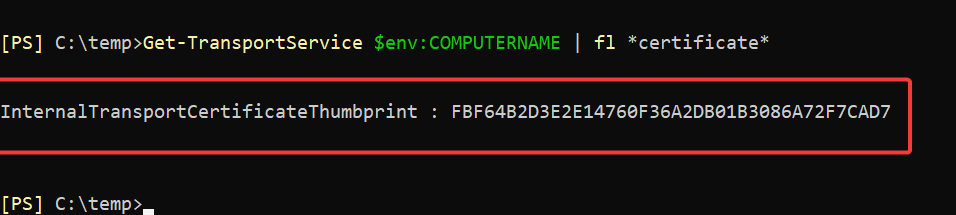
Now check the Exchange Server certificates:
Get-ExchangeCertificate |
ft Subject,Thum*,Not*,Status -AutoSize
Finally, run the Microsoft script:
.\MonitorExchangeAuthCertificate.ps1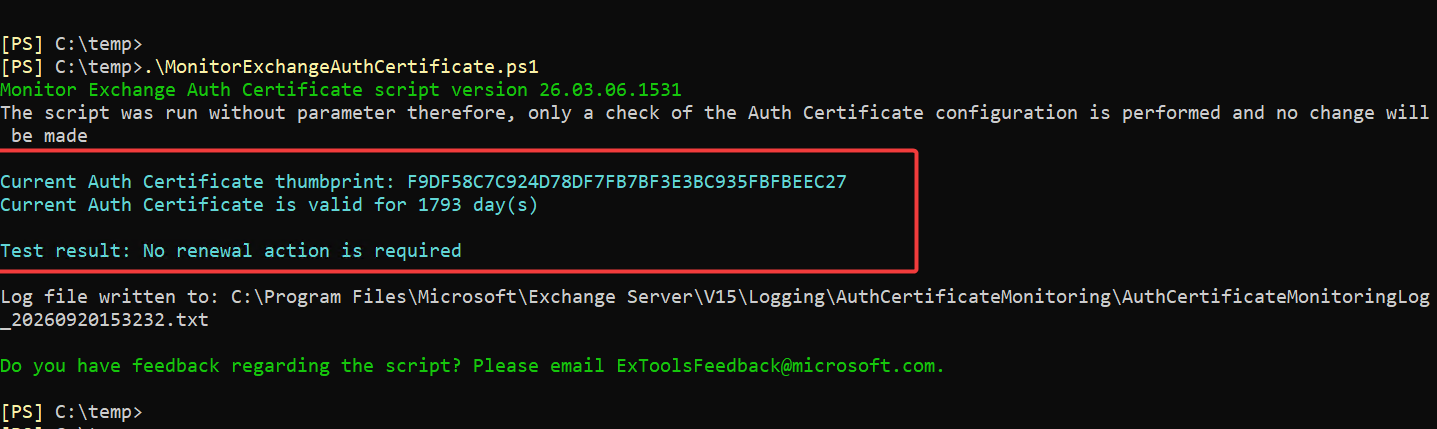
The important output is:
Current Auth Certificate is valid for 1793 day(s)
Test result: No renewal action is requiredThe Exchange Server Auth Certificate is healthy. No action is needed.
6. Case 2 – Valid but Expiring Exchange Server Auth Certificate
In this case, the Current certificate is still valid but is getting close to expiration.
This is a normal rotation case. The active certificate does not need to be replaced immediately.
First, check AuthConfig:
Get-AuthConfig | fl *certificate*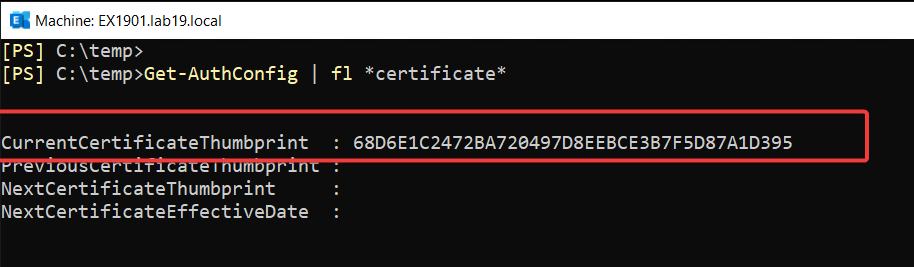
Record the Internal Transport Certificate:
Get-TransportService | fl Name,*certificate*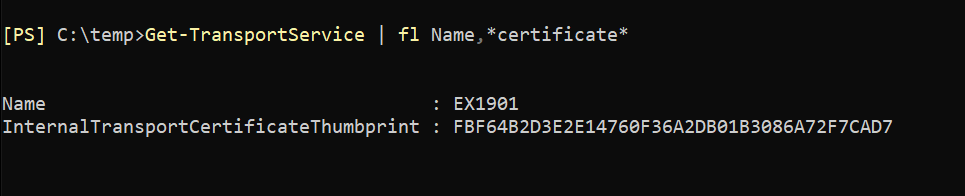
Check the certificate dates:
Get-ExchangeCertificate |
ft Subject,Thum*,Not*,Status -AutoSize
Run validation:
.\MonitorExchangeAuthCertificate.ps1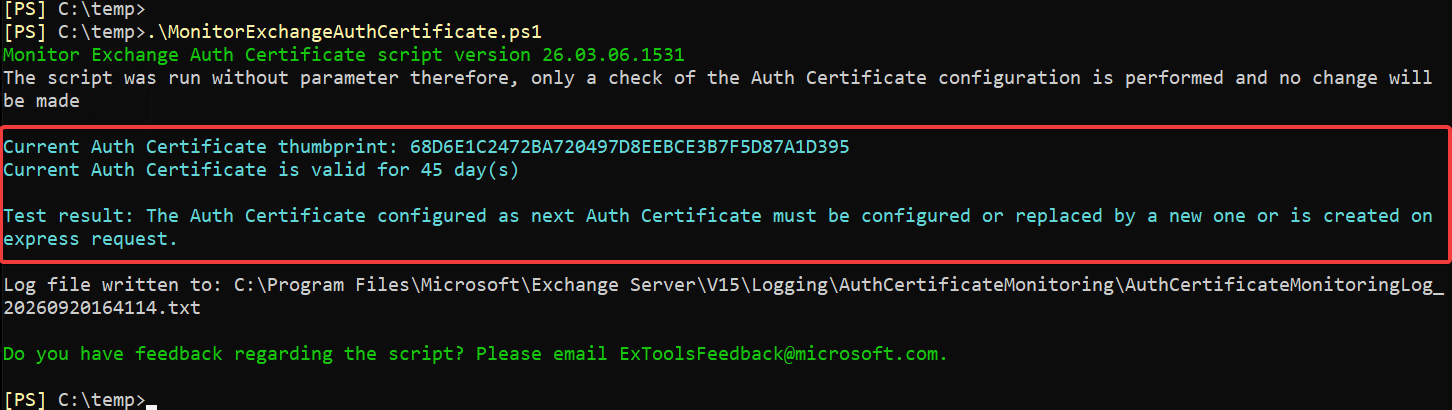
The important output is:
Current Auth Certificate is valid for 45 day(s)
Test result: The Auth Certificate configured as next Auth Certificate must be configured or replaced by a new one or is created on express request.The Current certificate is still valid, but the script now requires a new Next certificate.
6.1 Renew the Certificate
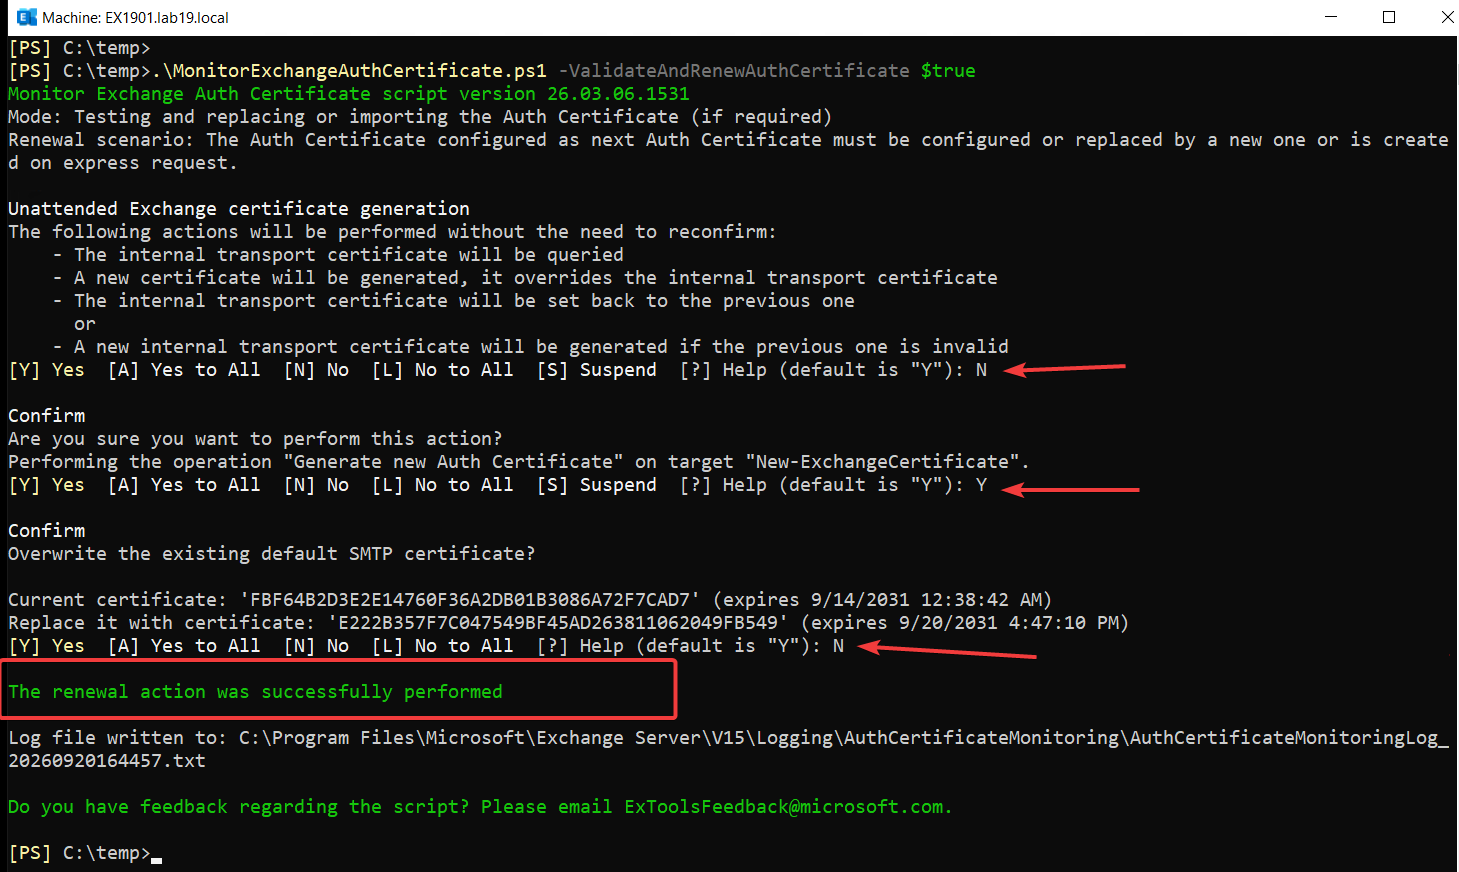
Run the script in renewal mode:
.\MonitorExchangeAuthCertificate.ps1 `
-ValidateAndRenewAuthCertificate $trueFor the interactive renewal, answer:
- Unattended Exchange certificate generation →
N
Keep the remaining actions interactive. - Generate new Auth Certificate →
Y
Create a new Exchange Server Auth Certificate and stage it as Next. - Overwrite the existing default SMTP certificate? →
N
Do not permanently replace the existing Internal Transport Certificate with the new Exchange Server Auth Certificate.
6.2 Post-Check
Check the configuration again:
Get-AuthConfig | fl *certificate*
Get-TransportService | fl Name,*certificate*
Get-ExchangeCertificate |
ft Subject,Thum*,Not*,Status -AutoSize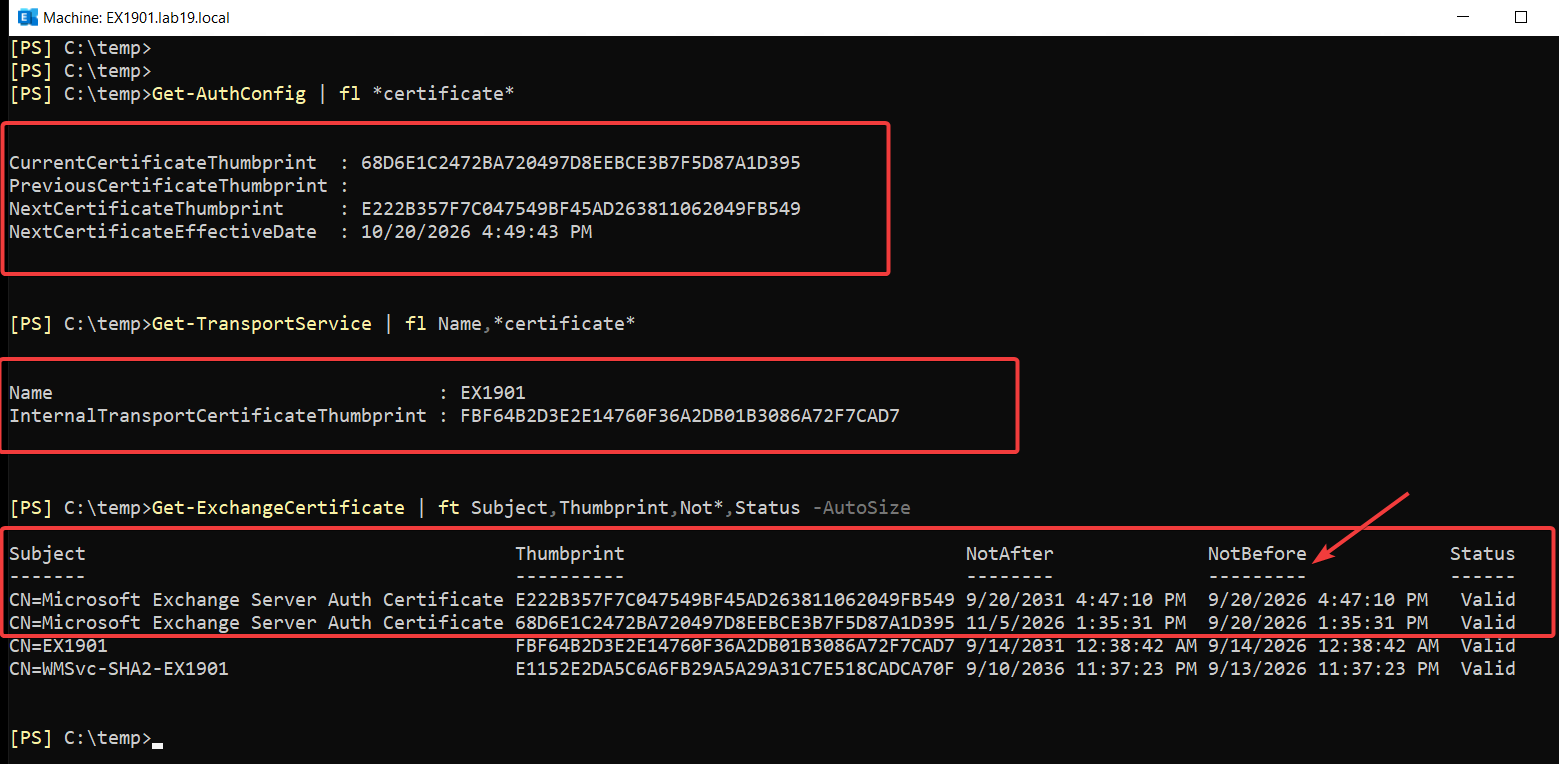
Confirm that:
- The existing certificate is still Current.
- The new certificate is configured as Next.
NextCertificateEffectiveDateis set.- The Internal Transport Certificate has not changed unexpectedly.
Run final validation:
.\MonitorExchangeAuthCertificate.ps1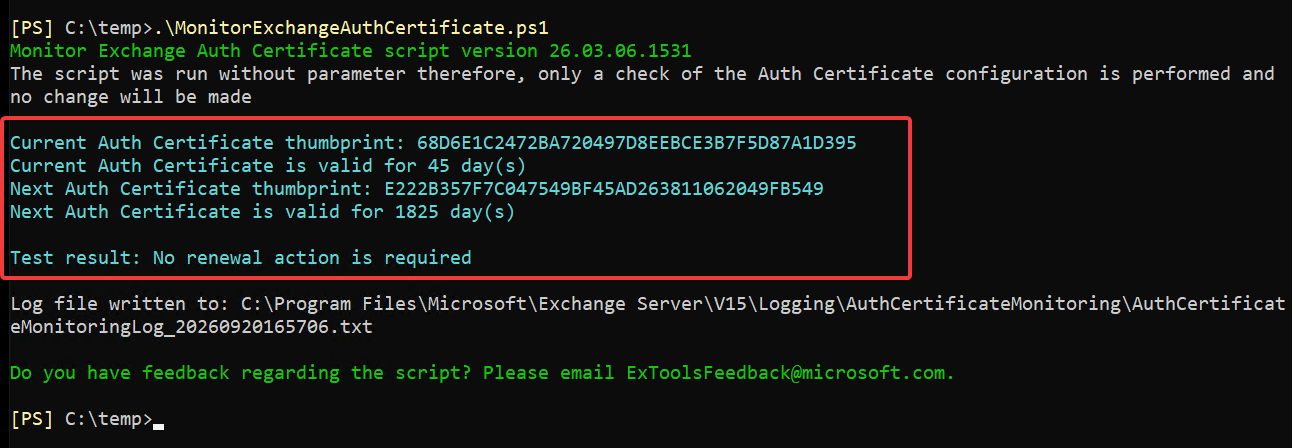
The important output is:
Current Auth Certificate is valid for 45 day(s)
Next Auth Certificate is valid for 1825 day(s)
Test result: No renewal action is required6.3 Do We Need to Restart Services or Do Anything Else?
Not at this point.
The Current certificate is still active. The new certificate is only staged as Next and has a future NextCertificateEffectiveDate.
The AuthAdmin servicelet runs under MSExchangeServiceHost. It normally runs every 12 hours. When NextCertificateEffectiveDate is reached, AuthAdmin publishes the Next certificate and makes it the new Current certificate automatically.
No manual Set-AuthConfig -PublishCertificate is needed for this normal staged rotation.
So yes, this transition is expected to complete automatically as long as the Exchange Server services are healthy and the new certificate is available on the required Exchange servers.
We do not restart MSExchangeServiceHost now because that would only force AuthAdmin to run immediately. The effective date has not been reached yet, so the Next certificate would still stay as Next.
We also do not restart MSExchangeOWAAppPool or MSExchangeECPAppPool at this stage because the active Current certificate has not changed yet.
After the scheduled rotation, you can confirm the result with:
Get-AuthConfig | fl *certificate*You can also check the Application log for:
Source: MSExchange AuthAdmin
Event ID: 2014Do not remove the old Current certificate while the new certificate is still configured as Next.
7. Case 3 – Expired or Invalid Exchange Server Auth Certificate
In this case, the Current certificate is already expired or invalid.
This is different from Case 2. We cannot wait for a scheduled rotation. The certificate must be replaced immediately.
First, check AuthConfig:
Get-AuthConfig | fl *certificate*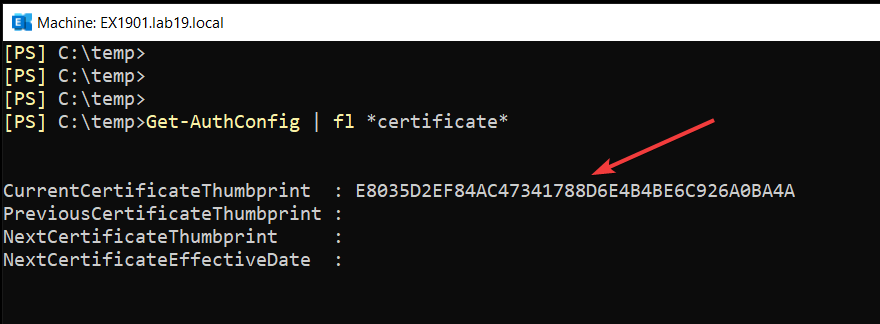
Record the Internal Transport Certificate:
Get-TransportService | fl Name,*certificate*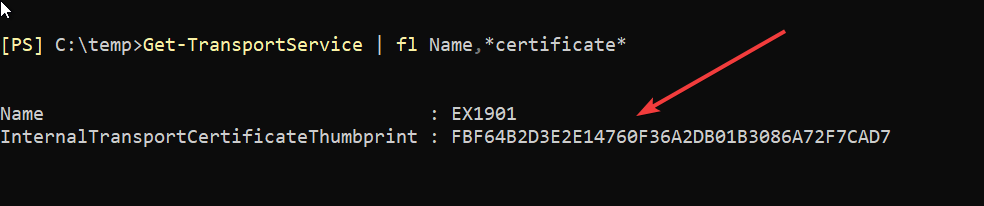
Check the Exchange Server certificates:
Get-ExchangeCertificate |
ft Subject,Thum*,Not*,Status -AutoSize
An expired certificate may appear as:
Status : InvalidSo do not check Status only. Also check NotAfter.
Run the Microsoft script in validation mode:
.\MonitorExchangeAuthCertificate.ps1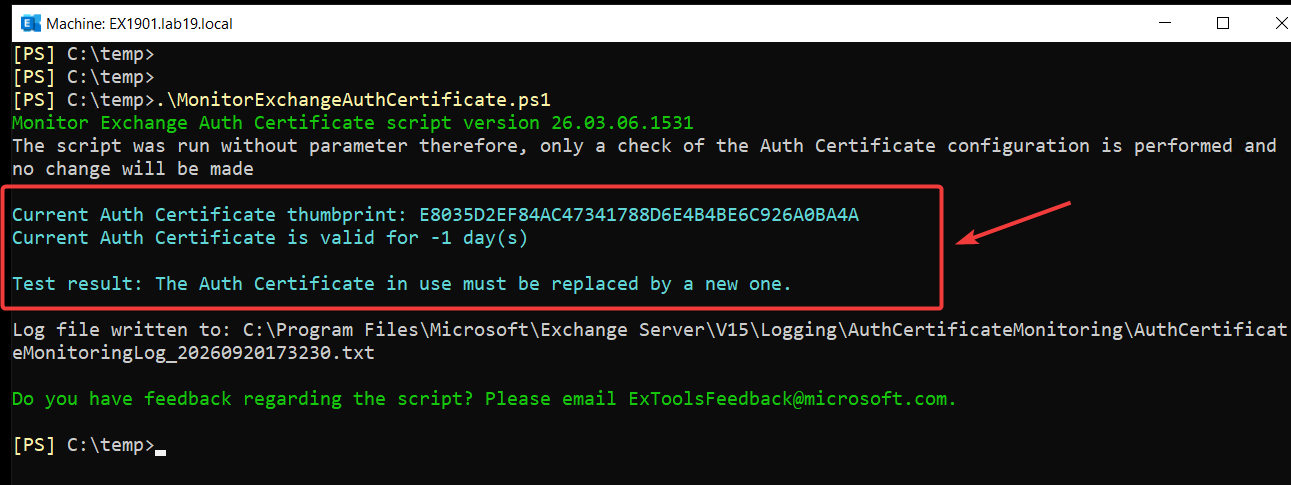
The important output is:
Current Auth Certificate is valid for -1 day(s)
Test result: The Auth Certificate in use must be replaced by a new one.This means immediate recovery is required.
7.1 Time Zone Issue During Immediate Recovery
During immediate recovery on a server using (UTC+03:00) Istanbul, the new Exchange Server Auth Certificate was not immediately usable.
In the official Microsoft MonitorExchangeAuthCertificate.ps1 solution, certificate creation can use this helper script:
Shared\CertificateFunctions\New-ExchangeSelfSignedCertificate.ps1Inside that Microsoft helper, the certificate validity starts with:
$notBefore = [System.DateTimeOffset]::UtcNow
$notAfter = $notBefore.AddDays($LifetimeInDays)This can become a problem during immediate recovery on servers using a positive UTC offset, for example:
UTC+2
UTC+3
UTC+10The new certificate may not yet be usable according to the server’s local time.
UTC and negative UTC offsets do not need the same adjustment.
Changing the Windows Server time zone to UTC also avoids the problem, but changing the server time zone is not a good recovery method.
For Case 3 and Case 4, I use a modified version of Microsoft’s MonitorExchangeAuthCertificate.ps1:
MonitorExchangeAuthCertificate-TimeZoneAware.ps1It keeps the Windows Server time zone unchanged and adjusts NotBefore only for positive UTC offsets.
Relevant change:
$utcOffset = [System.TimeZoneInfo]::Local.GetUtcOffset([DateTime]::Now)
$backdateHours = [Math]::Max(0, $utcOffset.TotalHours)
$notBefore = [System.DateTimeOffset]::UtcNow.AddHours(-$backdateHours)
$notAfter = $notBefore.AddDays($LifetimeInDays)Examples:
UTC+3 -> backdate 3 hours
UTC+10 -> backdate 10 hours
UTC -> no backdate
UTC-5 -> no backdateCase 2 does not need this because the new certificate is staged for a future effective date.
The TimeZoneAware script is a modified copy of the Microsoft script. It is not an official Microsoft release.
Important: The modified script requires -CustomCertificateLifetimeInDays 1825. When this value is greater than zero, the Microsoft solution uses New-ExchangeSelfSignedCertificate.ps1 instead of the normal New-ExchangeCertificate path. This is where the TimeZoneAware change is applied. The value 1825 keeps the normal five-year lifetime.
7.2 Recover the Expired or Invalid Certificate
For Case 3, check the server time zone of the Exchange Server where you run the script and create the new certificate.
If that server uses a positive UTC offset, such as UTC+2, UTC+3, or UTC+10, use the TimeZoneAware version:
.\MonitorExchangeAuthCertificate-TimeZoneAware.ps1 `
-ValidateAndRenewAuthCertificate $true `
-CustomCertificateLifetimeInDays 1825If that server uses UTC or a negative UTC offset, use the normal Microsoft script:
.\MonitorExchangeAuthCertificate.ps1 `
-ValidateAndRenewAuthCertificate $trueThis is especially important in multi-region Exchange Server environments, where servers may use different time zones.
For the interactive recovery, answer:
- Unattended Exchange certificate generation →
N
Keep the remaining actions interactive. - Generate new Auth Certificate →
Y
Create a new Exchange Server Auth Certificate. - Set-AuthConfig immediately →
Y
The active certificate cannot be used, so the new certificate must become active immediately. - PublishCertificate →
Y
Publish the new certificate as the active Exchange Server Auth Certificate.
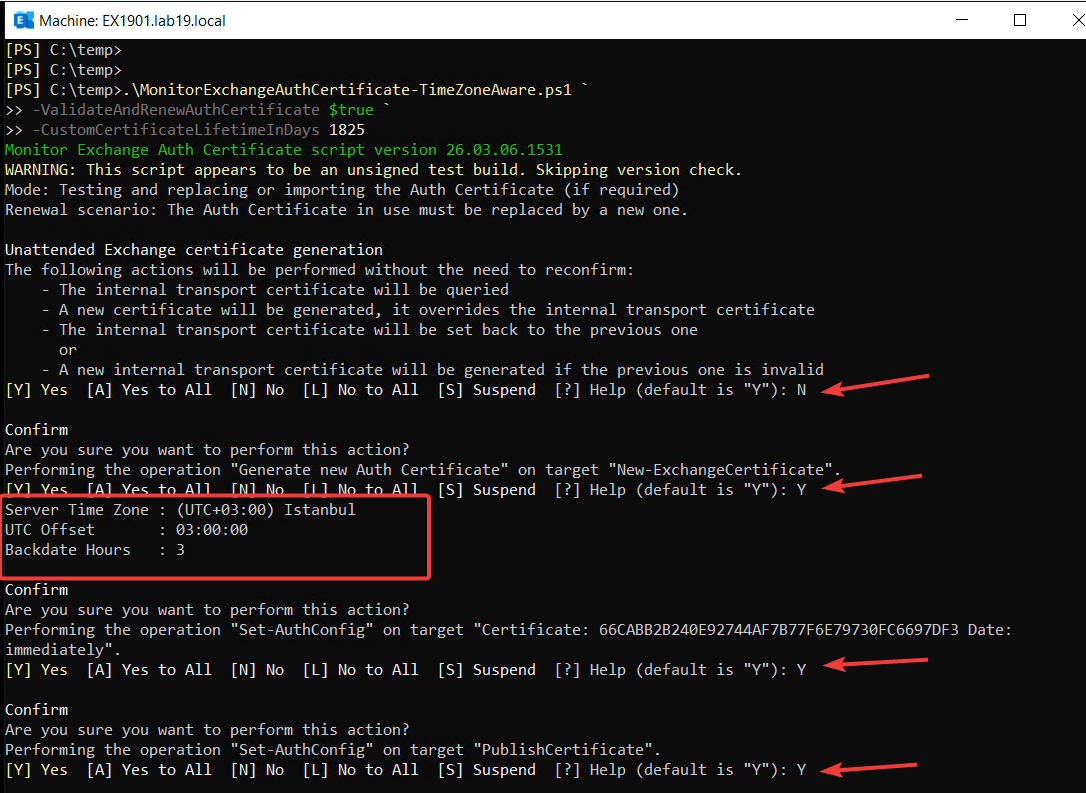
Then continue with:
- ClearPreviousCertificate →
Y - Restart-WebAppPool →
Y
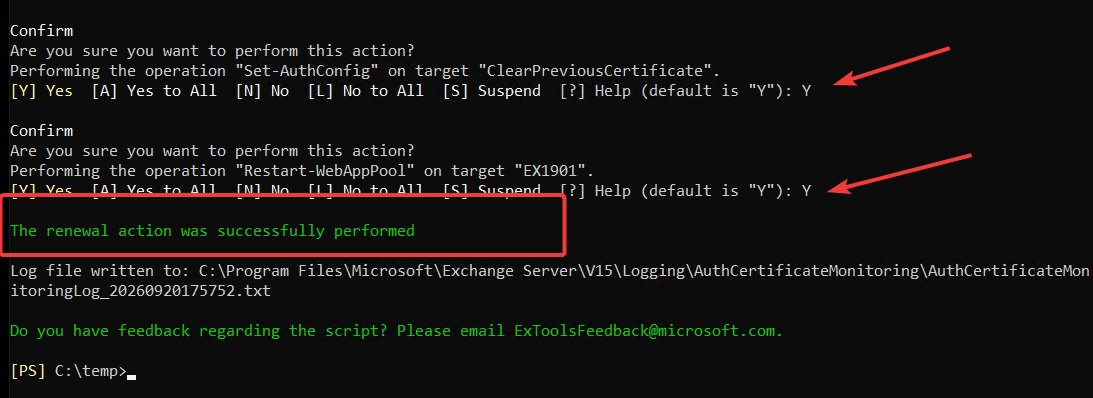
The important result is:
The renewal action was successfully performed7.3 Do We Need to Restart Services or Do Anything Else?
The immediate replacement path already handles the required restart actions.
The script restarts MSExchangeServiceHost so AuthAdmin can run immediately, and it can restart MSExchangeOWAAppPool and MSExchangeECPAppPool to refresh the cached Auth Certificate reference.
If these restart steps fail or need to be performed manually, restart Exchange Service Host first:
Restart-Service MSExchangeServiceHostThen recycle the OWA and ECP application pools:
Restart-WebAppPool MSExchangeOWAAppPool
Restart-WebAppPool MSExchangeECPAppPoolIf a brief IIS interruption is acceptable, iisreset can be used as a broader alternative. Otherwise, recycle only MSExchangeOWAAppPool and MSExchangeECPAppPool, as recommended by Microsoft.
7.4 Validate the Recovery
Run the normal post-checks:
Get-AuthConfig | fl *certificate*
Get-TransportService | fl Name,*certificate*
Get-ExchangeCertificate |
ft Subject,Thum*,Not*,Status -AutoSize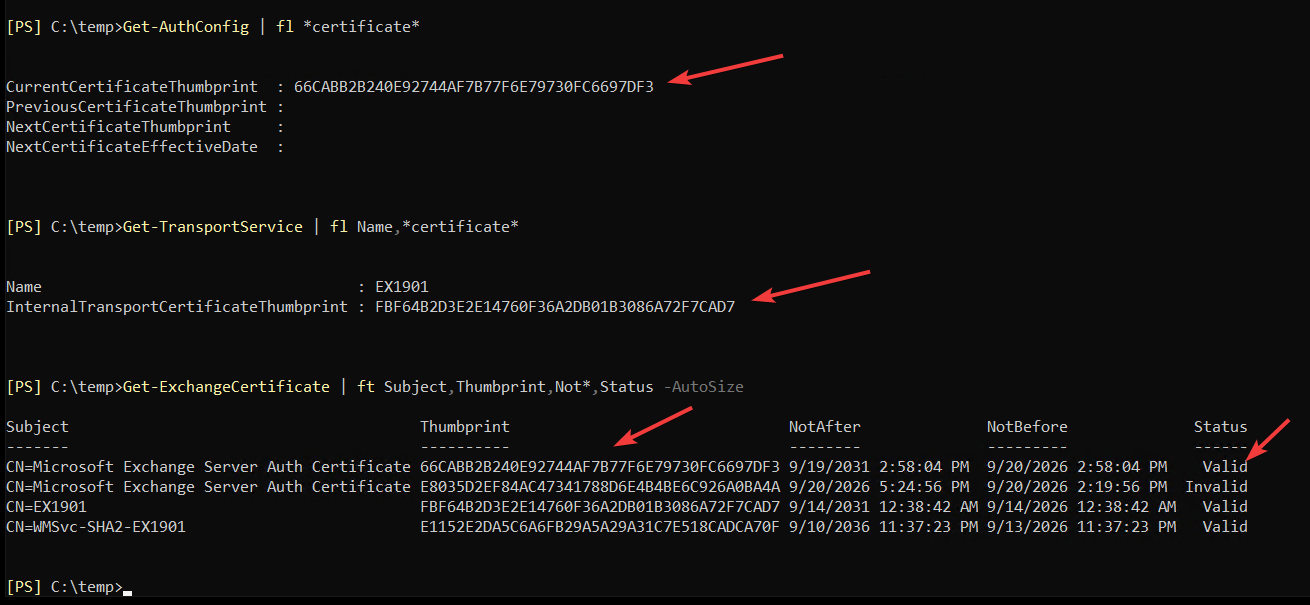
Confirm that the new certificate is Current, it is valid, and the Internal Transport Certificate has not changed unexpectedly.
Finally, run validation again.
If you used the TimeZoneAware version:
.\MonitorExchangeAuthCertificate-TimeZoneAware.ps1If you used the normal Microsoft script:
.\MonitorExchangeAuthCertificate.ps1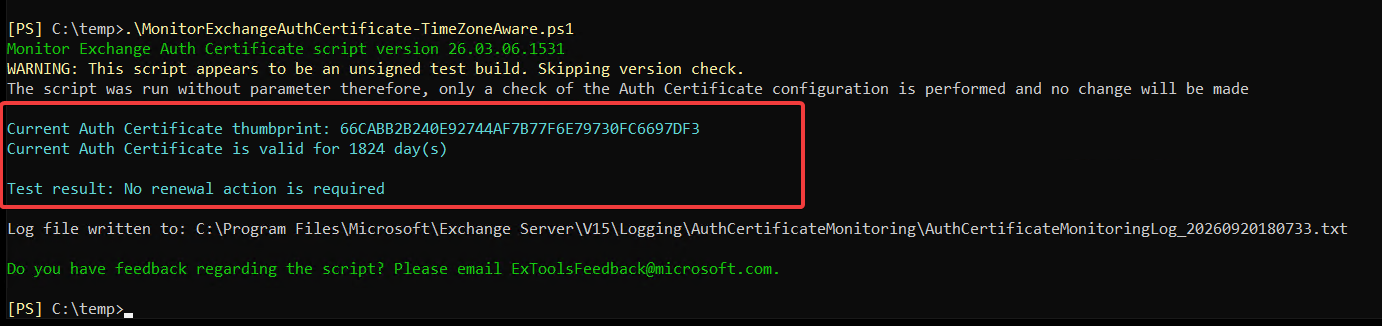
The important output is:
Current Auth Certificate is valid for 1824 day(s)
Test result: No renewal action is requiredAt this point, the new Exchange Server Auth Certificate is active and Case 3 is complete.
8. Case 4 – Missing Exchange Server Auth Certificate
In this case, AuthConfig still points to a Current certificate, but that certificate is missing from the Exchange Server.
First, check AuthConfig:
Get-AuthConfig | fl *certificate*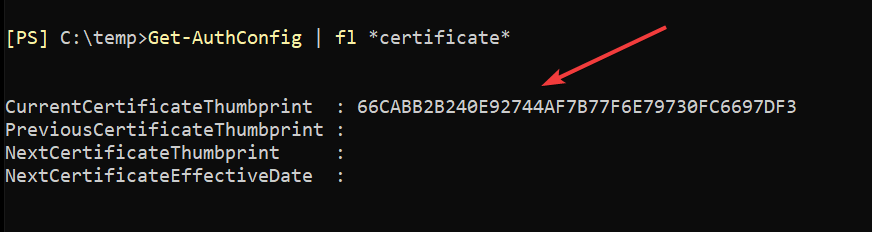
Record the Internal Transport Certificate:
Get-TransportService | fl Name,*certificate*
Now check the Exchange Server certificates:
Get-ExchangeCertificate |
ft Subject,Thum*,Not*,Status -AutoSizeIn this case, the command returned no certificate objects.
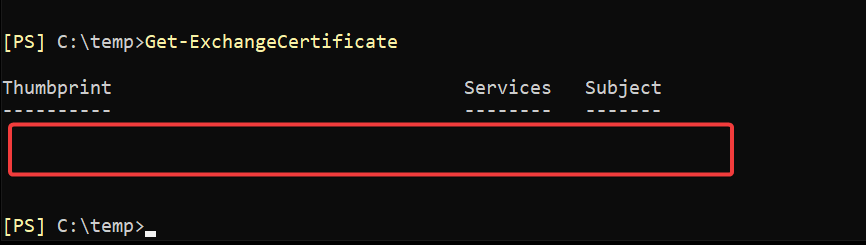
Because the Current thumbprint is already known from AuthConfig, check that exact certificate directly in the Windows certificate store:
Get-Item "Cert:\LocalMachine\My\66CABB2B240E92744AF7B77F6E79730FC6697DF3" |
fl Subject,Thum*,Not*,HasPrivateKey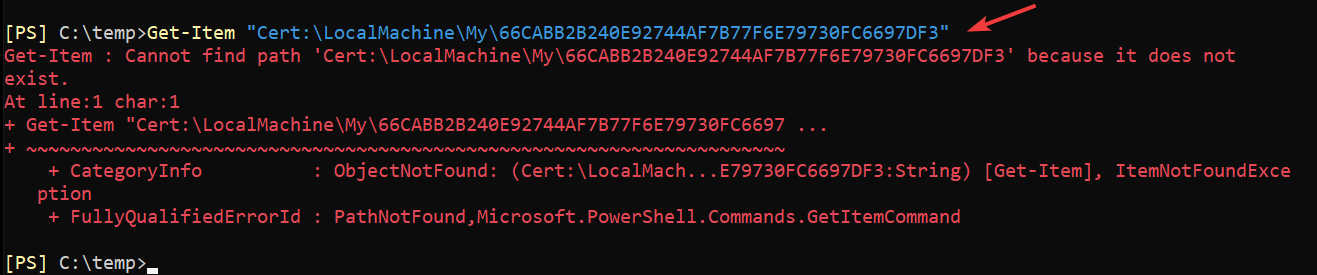
The important result is that the configured Current certificate cannot be found in the local certificate store.
Now run the Microsoft script in validation mode:
.\MonitorExchangeAuthCertificate.ps1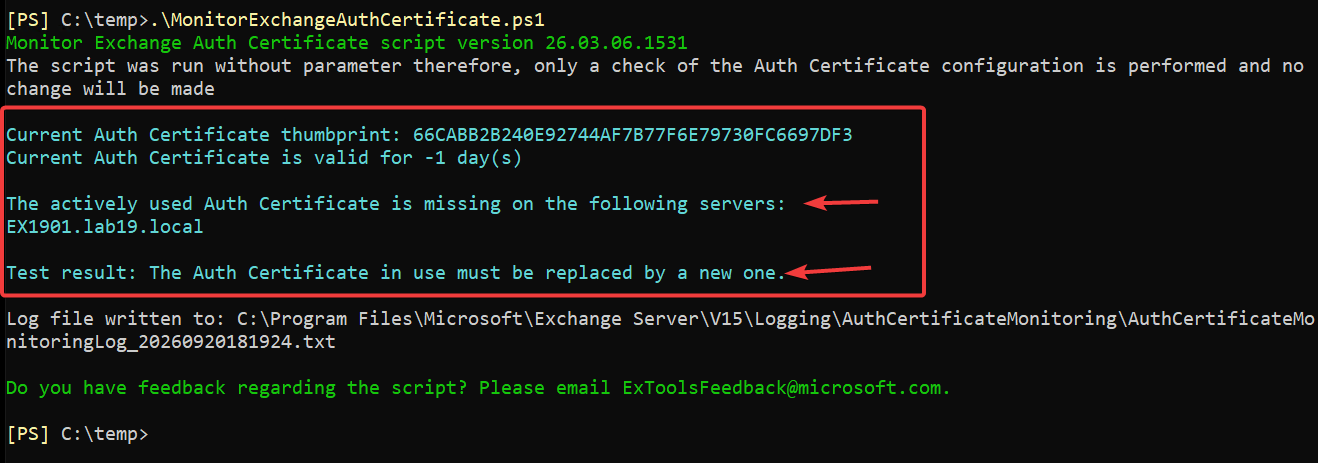
The important output is:
The actively used Auth Certificate is missing on the following servers:
Test result: The Auth Certificate in use must be replaced by a new one.8.1 Let the Script Decide: Import or Create and Replace
At this point, let MonitorExchangeAuthCertificate.ps1 decide the next action.
If the certificate exists on another reachable Exchange Server, the script exports the certificate and private key from that server into memory and imports it to the server where it is missing by using Import-ExchangeCertificate. No temporary PFX file is written to disk.
If the certificate is missing from all Exchange servers, the script creates and replaces it with a new Exchange Server Auth Certificate.
8.2 Create and Replace the Missing Certificate
If the certificate is missing from all Exchange servers, a new Exchange Server Auth Certificate must be created and activated immediately.
Check the server time zone of the Exchange Server where you run the script.
If that server uses a positive UTC offset, such as UTC+2 or UTC+3, use the TimeZoneAware version:
.\MonitorExchangeAuthCertificate-TimeZoneAware.ps1 `
-ValidateAndRenewAuthCertificate $true `
-CustomCertificateLifetimeInDays 1825If that server uses UTC or a negative UTC offset, use the normal Microsoft script:
.\MonitorExchangeAuthCertificate.ps1 `
-ValidateAndRenewAuthCertificate $trueNote: If Exchange Hybrid is configured, add -IgnoreHybridConfig $true to the command. After the active Exchange Server Auth Certificate is replaced, complete the Exchange Hybrid checks in Section 9.
For the interactive recovery, answer:
- Unattended Exchange certificate generation →
N
Keep the remaining actions interactive. - Generate new Auth Certificate →
Y
Create a new Exchange Server Auth Certificate. - Set-AuthConfig immediately →
Y
The active certificate cannot be used, so the new certificate must become active immediately. - PublishCertificate →
Y
Publish the new certificate as the active Exchange Server Auth Certificate.
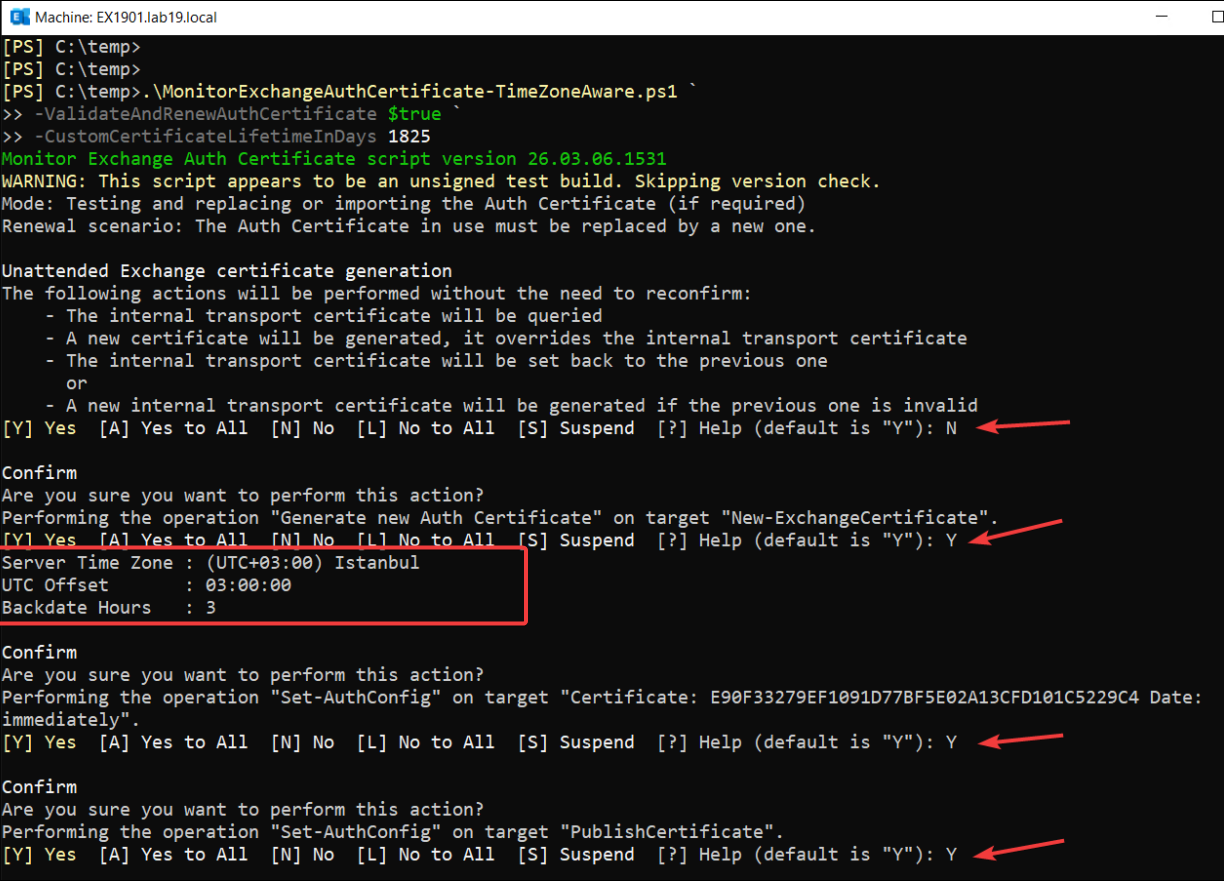
Then continue with:
- ClearPreviousCertificate →
Y - Restart-WebAppPool →
Y
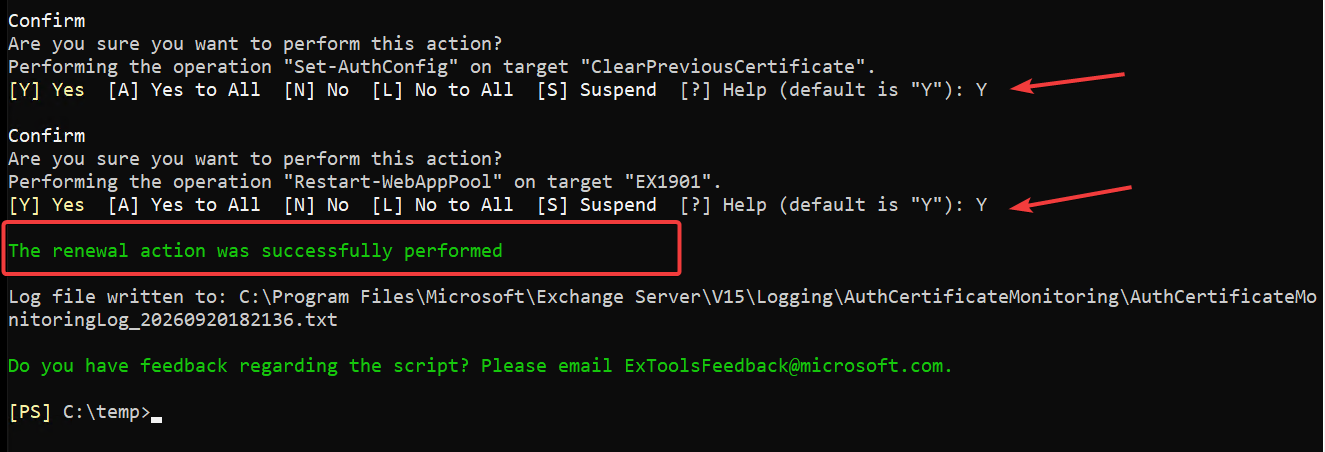
The important result is:
The renewal action was successfully performedThe new Exchange Server Auth Certificate is now created and activated.
8.3 Validate the Recovery
Run the normal post-checks:
Get-AuthConfig | fl *certificate*

Get-TransportService | fl Name,*certificate*

Get-ExchangeCertificate |
ft Subject,Thum*,Not*,Status -AutoSize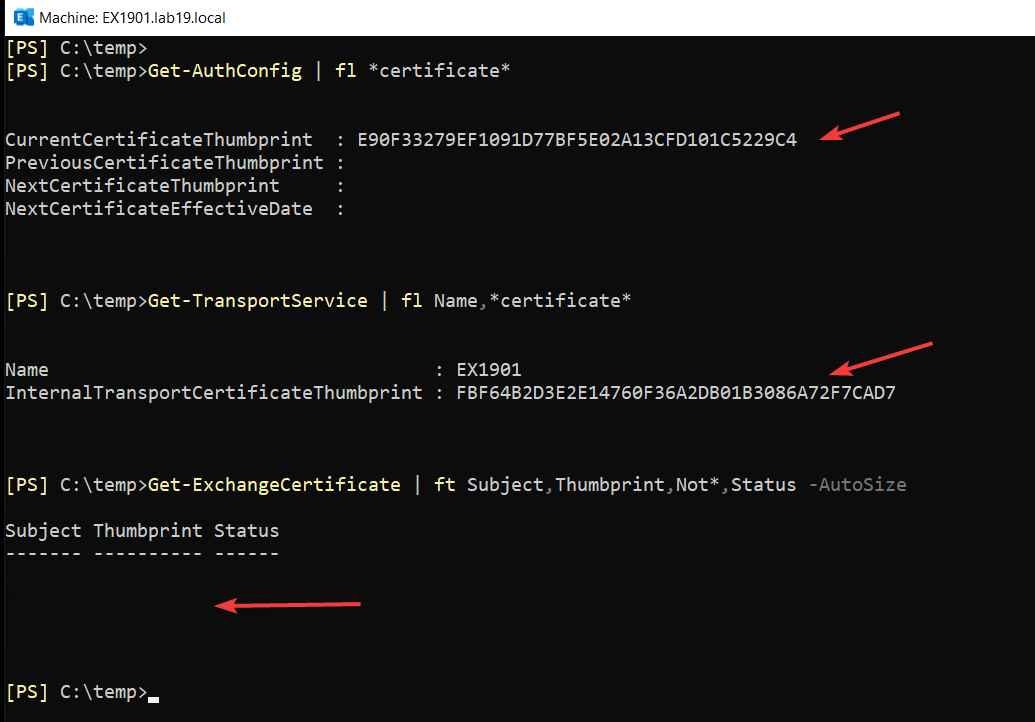
Confirm that the new certificate is now configured as the Current Exchange Server Auth Certificate and that the Internal Transport Certificate has not changed unexpectedly.
In this case, Get-ExchangeCertificate still returned no output even after the recovery completed successfully. If you see the same symptom while the Auth Certificate is otherwise valid, see Get-ExchangeCertificate Returns Blank with a Valid Auth Certificate.
So if Get-ExchangeCertificate returns nothing, do not use that command alone to decide that the recovery failed.
Check the Current certificate directly in the Windows certificate store:
Get-Item "Cert:\LocalMachine\My\E90F33279EF1091D77BF5E02A13CFD101C5229C4" |
fl Subject,Thum*,Not*,HasPrivateKey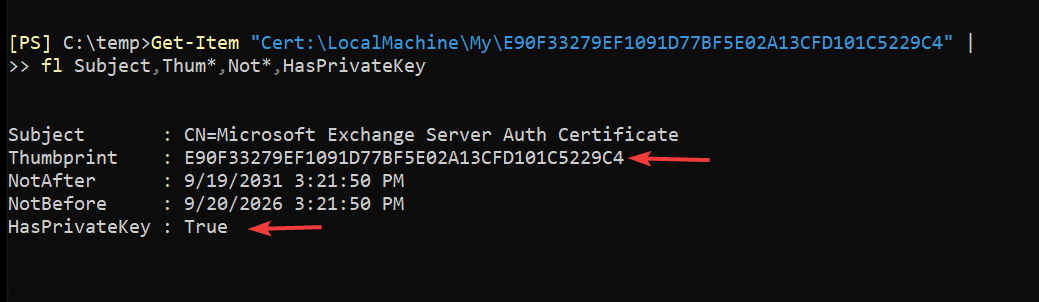
Confirm that:
- The thumbprint matches the Current certificate in AuthConfig.
NotBeforeandNotAfterare correct.HasPrivateKeyisTrue.
Finally, run the validation script again.
If you used the TimeZoneAware version:
.\MonitorExchangeAuthCertificate-TimeZoneAware.ps1If you used the normal Microsoft script:
.\MonitorExchangeAuthCertificate.ps1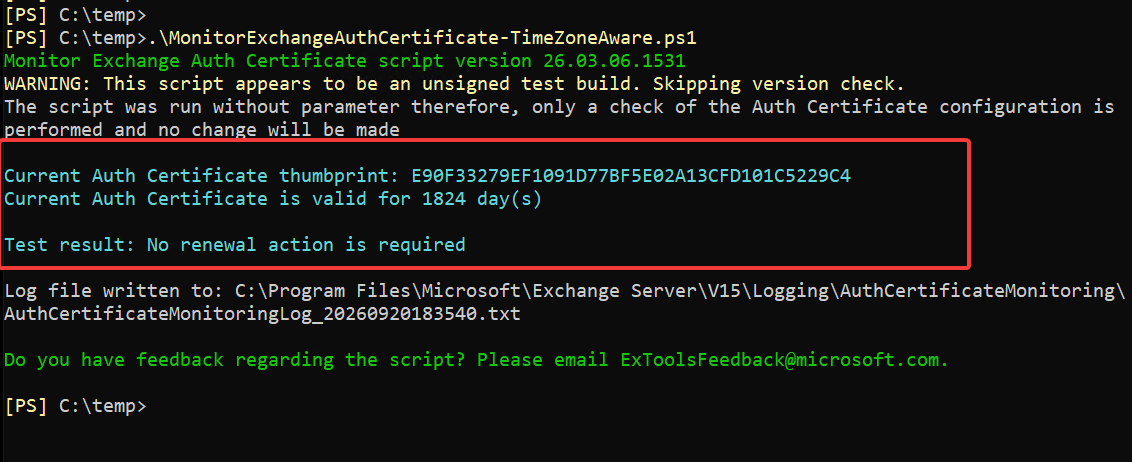
The important output is:
Current Auth Certificate is valid for 1824 day(s)

Test result: No renewal action is required
At this point, the new Exchange Server Auth Certificate is active and Case 4 is complete.
9. Post-Check for Exchange Hybrid Configuration
If Exchange Hybrid is configured and the active Exchange Server Auth Certificate was replaced, complete the Hybrid post-check before cleanup.
Microsoft ConfigureExchangeHybridApplication.ps1 script: https://aka.ms/ConfigureExchangeHybridApplication
Use the case that matches your environment:
- Case 1 – Exchange Hybrid Configured with HCW
- Case 2 – Exchange OAuth Configured Manually Without HCW
9.1 Case 1 – Exchange Hybrid Configured with HCW
If the Hybrid configuration was created and managed with the Hybrid Configuration Wizard, run the latest HCW again after replacing the active Exchange Server Auth Certificate.
Microsoft explicitly recommends this:
“Yes, we strongly recommend running the Hybrid Configuration Wizard (HCW) after the active Auth Certificate is replaced.”
Maintain the Exchange Server OAuth certificate – Microsoft Learn
If the environment uses the Dedicated Exchange Hybrid Application, update its certificate:
.\ConfigureExchangeHybridApplication.ps1 -UpdateCertificateAfterward, validate the Hybrid features used in the environment, such as Free/Busy and MailTips.
9.2 Case 2 – Exchange OAuth Configured Manually Without HCW
Use this case if the Exchange Hybrid OAuth configuration is managed manually and HCW is not used for that configuration.
After replacing the Exchange Server Auth Certificate, update the certificate in the existing OAuth configuration.
If the environment uses the Dedicated Exchange Hybrid Application, run:
.\ConfigureExchangeHybridApplication.ps1 -UpdateCertificateThen validate the Hybrid functionality used in the environment.
Detailed HCW, Shared App, Dedicated App, EWS, and Graph configuration is outside the scope of this guide.
9.3 Author Field Note – HCW vs. Targeted Certificate Update
If the Hybrid configuration is already healthy and the only change is the Exchange Server Auth Certificate, my preference would normally be to avoid rerunning the full HCW and use the more targeted command:
.\ConfigureExchangeHybridApplication.ps1 -UpdateCertificate
This updates the Auth Certificate used by the Dedicated Exchange Hybrid Application without reconfiguring the wider Hybrid configuration.
However, Microsoft still strongly recommends rerunning HCW after the active Auth Certificate is replaced. For that reason, I follow the documented recommendation and rerun HCW.
There is one important point if the Dedicated Exchange Hybrid Application is already in use. If HCW is rerun with OAuth, Intra Organization Connector and Organization Relationship selected, the Auth Certificate is uploaded to the old first-party Service Principal again. Microsoft strongly recommends purging it again afterward.
So my post-check is:
- Rerun HCW as recommended by Microsoft.
- Run
.\ConfigureExchangeHybridApplication.ps1 -UpdateCertificateto update the Dedicated Exchange Hybrid Application. - If HCW uploaded the Auth Certificate to the first-party Service Principal again, run
.\ConfigureExchangeHybridApplication.ps1 -ResetFirstPartyServicePrincipalKeyCredentialsto clean it up. - Validate the OAuth and Hybrid functionality used in the environment.
10. Cleanup
Cleanup depends on which case you followed.
Before removing any certificate, confirm that it is no longer configured as the Current or Next Exchange Server Auth Certificate.
10.1 Cleanup After Case 1 – Healthy Certificate
No cleanup is required.
The Exchange Server Auth Certificate is healthy and no certificate changes were made.
10.2 Cleanup After Case 2 – Valid but Expiring Certificate
Do not remove the old Current certificate while the new certificate is still configured as Next.
Wait until the scheduled rotation completes.
Then check:
Get-AuthConfig | fl *certificate*Confirm that the new certificate is now Current.
After validation is complete, the old certificate can be removed if it is no longer configured as Current or Next and is no longer required:
Remove-ExchangeCertificate -Thumbprint <OLD-THUMBPRINT>10.3 Cleanup After Case 3 – Expired or Invalid Certificate
After the new Exchange Server Auth Certificate is active and validation is successful, check AuthConfig:
Get-AuthConfig | fl *certificate*If Exchange Hybrid is configured, complete the Section 9 post-check first.
Then remove the old expired or invalid certificate only if it is no longer configured as Current or Next:
Remove-ExchangeCertificate -Thumbprint <OLD-THUMBPRINT>10.4 Cleanup After Case 4 – Missing Certificate
If the old certificate was missing from the affected Exchange Server, there may be nothing to remove on that server.
In a multi-server organization, the old certificate may still exist on other Exchange servers.
First confirm the Current and Next certificate state:
Get-AuthConfig | fl *certificate*Then remove old copies only if they are no longer configured as Current or Next and are no longer required.
Remove-ExchangeCertificate -Thumbprint <OLD-THUMBPRINT>Also remember:
Set-AuthConfig -ClearPreviousCertificateThis clears the Previous Certificate reference from AuthConfig. It does not remove the certificate from the certificate store.
Rule: Never remove a certificate that is still configured as Current or Next in AuthConfig.
11. Key Takeaways
- Always start with validation mode before making any certificate changes.
- If the Current certificate is still valid, use the normal staged rotation process.
- If the Current certificate is expired, invalid, or missing everywhere, immediate replacement is required.
- For immediate recovery, check the server time zone of the Exchange Server where you run the script. Use the TimeZoneAware version only for positive UTC offsets. For UTC or negative UTC offsets, use the normal Microsoft script.
- If Exchange Hybrid is configured and the active Auth Certificate is replaced, complete the Hybrid post-check before cleanup.
- Never remove a certificate that is still configured as Current or Next in AuthConfig.
References
- MonitorExchangeAuthCertificate – Microsoft CSS-Exchange
- Maintain the Exchange Server OAuth certificate – Microsoft Learn
- Deploy dedicated Exchange hybrid app – Microsoft Learn

Cloud and infrastructure professional with nearly two decades of experience in enterprise IT environments, spanning public cloud, private cloud, and hybrid architectures.