Applies to: Exchange Server SE / 2019 | Microsoft Teams
Microsoft Teams Calendar can be integrated with Exchange Server on-premises. Normally, we use the Hybrid Configuration Wizard (HCW) to configure the integration between Exchange Server and Microsoft 365.
However, some customers keep all their mailboxes on-premises, with no mailboxes in Exchange Online. They use Microsoft Teams but do not need mailbox migration, hybrid mail flow, or other Exchange coexistence features.
HCW can also configure additional Hybrid components, such as Organization Relationships, IntraOrganizationConnectors, and mail flow connectors, depending on the selected options.
For this scenario, I wanted a more controlled approach. Instead of running HCW, I wanted to configure only the components required for Teams Calendar and understand what each one does.
I started with basic Teams Calendar integration and then added the configuration needed for Teams Meeting Delegation.
In this article, I’ll share the configuration steps, explain why each component is needed, show how to verify the integration, and cover the issues I encountered and how I resolved them.
In This Article
- 1. What We Want to Achieve
- 2. Prerequisites and Architecture
- 3. Configure Teams Calendar Integration
- 4. Configure Teams Meeting Delegation
- 5. Possible Issues and Solutions
- 6. Key Takeaways
1. What We Want to Achieve
The goal is to enable two features for users whose mailboxes are hosted on Exchange Server on-premises: Teams Calendar integration and Teams Meeting Delegation.
Teams Calendar integration allows users to:
- View their Exchange calendars in Microsoft Teams.
- Create and manage calendar events from Teams.
- Schedule Teams meetings and access meeting details.
Teams Meeting Delegation allows users with the required permissions to schedule Teams meetings on behalf of another user.
Each feature has different configuration requirements. Basic Teams Calendar integration is configured first. Teams Meeting Delegation requires additional components, which are covered separately.
2. Prerequisites and Architecture
Before configuring Teams Calendar integration, make sure the Exchange Server and Microsoft 365 environment meets the following requirements.
2.1 Prerequisites
- Exchange Server: Exchange Server SE or 2019 with user mailboxes hosted on-premises.
- Microsoft Entra Connect Sync: Users must be synchronized to Microsoft Entra ID, with the Exchange Hybrid Deployment option enabled.
- Microsoft Teams: Users must have the required Teams licenses, and the Teams Calendar app must be available.
- Exchange Online: Synchronized on-premises mailbox users must be represented as MailUser objects, not Exchange Online UserMailbox objects.
- Autodiscover: Autodiscover V2 must correctly identify the on-premises EWS endpoint.
- Exchange Web Services (EWS): EWS must be published externally over HTTPS, with OAuth authentication enabled. Organization-level or mailbox-level EWS access policies must not block Teams.
- Certificates: Exchange HTTPS endpoints must use trusted certificates, and the Exchange OAuth authentication certificate must be valid.
- Network: The firewall or reverse proxy must allow the required Microsoft 365 and Teams services to access the published Exchange endpoints.
2.2 How Teams Communicates with Exchange Server
Microsoft Teams uses Autodiscover to locate the user’s Exchange mailbox and Exchange Web Services (EWS) to access calendar information.
When the mailbox is hosted on-premises, Teams uses OAuth to authenticate to Exchange Server.
The main components involved are:
- Autodiscover V2: Allows Teams to discover the location of the user’s mailbox and its EWS endpoint.
- EWS: Provides access to calendar events and meeting information.
- OAuth: Allows Microsoft 365 services to authenticate to Exchange Server without using the user’s password.
- EvoSTS AuthServer: Allows Exchange Server to trust OAuth tokens issued by Microsoft Entra ID.
- Service Principal Names (SPNs): Register the Exchange HTTPS namespaces with the Exchange Online service principal in Microsoft Entra ID.
In this environment, the published Exchange endpoints are:
- EWS:
https://mail.onpremx.cloud/EWS/Exchange.asmx - Autodiscover:
https://autodiscover.onpremx.cloud/
These URLs are specific to this environment. Use your own Exchange namespaces when following the configuration steps.
The next section covers the EvoSTS and SPN configuration for basic Teams Calendar integration. Additional components required for Teams Meeting Delegation are covered separately in Section 4.
3. Configure Teams Calendar Integration
3.1 Configure the EvoSTS AuthServer
The EvoSTS AuthServer allows Exchange Server to trust OAuth tokens issued by Microsoft Entra ID.
In Exchange Management Shell, check the existing AuthServers:
Get-AuthServer | Format-Table Name,Type,EnabledIf the EvoSTS AuthServer does not exist, create it using your Microsoft 365 tenant’s initial domain:
New-AuthServer -Name "evoSTS" -Type AzureAD -AuthMetadataUrl "https://login.windows.net/jl48zykc.onmicrosoft.com/federationmetadata/2007-06/federationmetadata.xml"Replace jl48zykc.onmicrosoft.com with your tenant’s initial domain. The name evoSTS identifies the AuthServer object; it is not a fixed Microsoft Application ID.
Verify that the AuthServer has been created:
Get-AuthServer | Format-Table Name,Type,Enabled3.2 Register Exchange SPNs in Microsoft Entra ID
Microsoft Teams must be able to request OAuth tokens for the Exchange HTTPS namespaces. Register the EWS and Autodiscover namespaces with the Exchange Online service principal in Microsoft Entra ID.
You can run the following Microsoft Graph PowerShell commands on an approved management workstation or server. They do not require a domain controller.
Install the Microsoft Graph Applications module if it is not already installed:
Install-Module Microsoft.Graph.Applications -Scope AllUsersConnect to Microsoft Graph:
Connect-MgGraph -Scopes "Application.ReadWrite.All" -UseDeviceCode
(Get-MgContext).TenantIdVerify that the displayed Tenant ID belongs to the correct Microsoft 365 tenant before updating any SPNs.
Get the Exchange Online service principal and display its existing SPNs:
$sp = Get-MgServicePrincipal -Filter "AppId eq '00000002-0000-0ff1-ce00-000000000000'"
$sp.ServicePrincipalNames | Sort-ObjectThe Application ID 00000002-0000-0ff1-ce00-000000000000 is defined by Microsoft and must not be changed.
Add the Exchange namespaces without removing the existing SPNs:
$names = @($sp.ServicePrincipalNames)
foreach ($name in @('https://mail.onpremx.cloud/','https://autodiscover.onpremx.cloud/')) {
    if ($names -notcontains $name) {
        $names += $name
    }
}
$names | Sort-ObjectReplace the two onpremx.cloud URLs with your own published Exchange namespaces. Review the complete SPN list and confirm that all existing entries are preserved before applying the change.
When the list is correct, run the following command separately:
Update-MgServicePrincipal -ServicePrincipalId $sp.Id -ServicePrincipalNames $namesThe Update-MgServicePrincipal command updates the complete SPN collection.
Verify the registered SPNs:
Get-MgServicePrincipal -Filter "AppId eq '00000002-0000-0ff1-ce00-000000000000'" | Select-Object -ExpandProperty ServicePrincipalNames | Sort-Object3.3 Verify Teams Calendar Integration
After registering the Exchange SPNs, allow at least a few minutes for the changes to take effect.
Open the Microsoft Remote Connectivity Analyzer.
- Select Teams Calendar App.
- Enter the required information for a user whose mailbox is hosted on-premises and run the test.
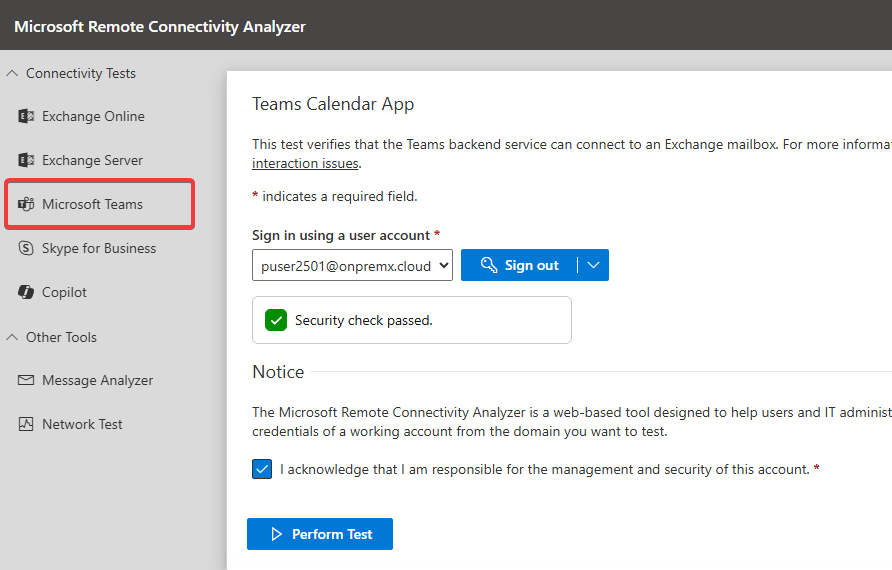
Once the test passes, open Microsoft Teams → Calendar and confirm that the user’s Exchange calendar and existing events are visible.
Also verify the following:
- Create a calendar event in Teams and confirm that it appears in Outlook.
- Create a calendar event in Outlook and confirm that it appears in Teams.
- Update an existing event and confirm that the changes appear in both clients.
If your requirement is only basic Teams Calendar integration with on-premises Exchange mailboxes, the configuration above is sufficient in this scenario.
Teams Meeting Delegation requires additional configuration, which is covered in the next section.
4. Configure Teams Meeting Delegation
If you want to enable Teams Meeting Delegation, additional configuration is required.
This allows a user to schedule Teams meetings on behalf of another user whose mailbox is hosted on Exchange Server on-premises.
The configuration involves a MailUser, restricted RBAC permissions, the Teams Calendar Scheduler PartnerApplication, additional OAuth components, and Calendar Delegate permissions.
4.1 Create a MailUser and Configure RBAC Permissions
Microsoft Teams Calendar Scheduler requires a mail-enabled user object (MailUser) with specific Exchange permissions.
A MailUser is an Active Directory user account with an external email address but without an Exchange mailbox. In this configuration, the MailUser is linked to the Teams Calendar Scheduler PartnerApplication.
In Exchange Management Shell, create the MailUser:
$user = New-MailUser -Name "TeamsIntegration-ApplicationAccount" -ExternalEmailAddress "TeamsIntegration-ApplicationAccount@onpremx.cloud"Hide the MailUser from the address lists:
Set-MailUser -Identity $user.UserPrincipalName -HiddenFromAddressListsEnabled $trueImportant: onpremx.cloud is a verified domain in my Microsoft 365 tenant. Replace it with your own verified domain, preferably the primary SMTP domain used by your on-premises Exchange users. The MailUser name can be customized.
Next, create a management role based on the built-in UserApplication role:
New-ManagementRole -Name "TeamsIntegrationRole" -Parent "UserApplication"The Teams Calendar Scheduler service requires seven management role entries. Remove all other entries from the newly created role:
$roleEntries = @("GetDelegate","FindItem","GetUserOofSettings","DeleteItem","UpdateItem","GetAttachment","ConvertId")

Get-ManagementRoleEntry "TeamsIntegrationRole\*" |
Where-Object { $roleEntries -notcontains $_.Name } |
ForEach-Object {
    Remove-ManagementRoleEntry -Identity "TeamsIntegrationRole\$($_.Name)" -Confirm:$false
}This modifies only the newly created role, not the built-in UserApplication role. Make sure the new role does not already exist before running these commands.
Assign the restricted role to the MailUser:
New-ManagementRoleAssignment -Role "TeamsIntegrationRole" -User $user.UserPrincipalNameVerify the assigned role entries:
Get-ManagementRoleEntry "TeamsIntegrationRole\*" | Format-Table NameThe result should contain only the seven entries listed above.
4.2 Configure Teams Calendar Scheduler PartnerApplication
The Teams Calendar Scheduler PartnerApplication allows Exchange Server to recognize the Teams scheduling service and associate it with the restricted MailUser.
In Exchange Management Shell, check the existing PartnerApplications:
Get-PartnerApplication | Format-Table Name,ApplicationIdentifier,EnabledIf the Teams Calendar Scheduler PartnerApplication does not exist, retrieve the MailUser created in Section 4.1, then create the PartnerApplication:
$user = Get-MailUser "TeamsIntegration-ApplicationAccount"New-PartnerApplication -Name "TeamsScheduler" -ApplicationIdentifier "7557eb47-c689-4224-abcf-aef9bd7573df" -Enabled $true -LinkedAccount $user.UserPrincipalNameImportant: 7557eb47-c689-4224-abcf-aef9bd7573df is the Microsoft-defined Application ID for Teams Calendar Scheduler. It is the same for all Microsoft 365 tenants and must not be changed.
The PartnerApplication name can be customized. The LinkedAccount parameter links it to the MailUser created in Section 4.1.
Verify the configuration:
Get-PartnerApplication "TeamsScheduler" | Format-List Name,ApplicationIdentifier,Enabled,LinkedAccount4.3 Configure Additional OAuth Components
Microsoft’s delegation procedure also includes the following OAuth configuration.
First, check the existing AuthServer configuration in Exchange Management Shell:
Get-AuthServer | Format-Table Name,Type,EnabledIf WindowsAzureACS is not configured, create it:
New-AuthServer -Name "WindowsAzureACS" -AuthMetadataUrl "https://accounts.accesscontrol.windows.net/jl48zykc.onmicrosoft.com/metadata/json/1"Replace jl48zykc.onmicrosoft.com with your Microsoft 365 tenant’s initial domain.
WindowsAzureACS allows Exchange Server to recognize tokens from the ACS issuer. This is different from the obsolete procedure of uploading an Exchange OAuth certificate to ACS.
Next, check the existing Exchange Online PartnerApplication using its Application ID and an empty Realm:
Get-PartnerApplication | Where-Object {
    $_.ApplicationIdentifier -eq "00000002-0000-0ff1-ce00-000000000000" -and $_.Realm -eq ""
} | Format-List Name,ApplicationIdentifier,Realm,EnabledThe Application ID 00000002-0000-0ff1-ce00-000000000000 is defined by Microsoft and must not be changed.
If the matching PartnerApplication exists but is disabled, enable it:
Get-PartnerApplication | Where-Object {
    $_.ApplicationIdentifier -eq "00000002-0000-0ff1-ce00-000000000000" -and $_.Realm -eq ""
} | Set-PartnerApplication -Enabled $trueDespite its name, the Exchange Online PartnerApplication is managed in the on-premises Exchange Management Shell.
These OAuth components are separate from the Teams Calendar Scheduler PartnerApplication created in Section 4.2.
4.4 Verify Teams Meeting Delegation
Before testing, configure Calendar Delegate permissions.
In Classic Outlook, sign in as the delegator and open:
File → Account Settings → Delegate Access
Add the delegate and assign Editor permission to the Calendar.
Microsoft specifies Author as the minimum permission required for creating meetings. Editor also allows calendar items to be modified.
Use Outlook’s Delegate Access configuration rather than Calendar folder permissions alone.
After completing the configuration, allow a few minutes for the changes to take effect.
Open the Microsoft Remote Connectivity Analyzer.
- Select Teams Meeting Delegation.
- Sign in with the delegate account.
- Enter the delegator’s email address and run the test.
Once the RCA test passes, verify the meeting functionality in Classic Outlook using the delegate account:
- Open the delegator’s Calendar.
- Create a Teams meeting on behalf of the delegator.
- Confirm that the meeting appears in the delegator’s calendar.
- Confirm that the meeting contains a Teams joining link, Meeting ID, and passcode.
- Send the invitation and confirm that the attendee receives it.
- Verify that the attendee’s response is received by the organizer.
This completes the Teams Meeting Delegation configuration for the scenario covered in this article.
5. Possible Issues and Solutions
5.1 Teams Calendar: TokenGenerationFailed and ErrorNonExistentMailbox
The Teams Calendar RCA test may fail with:
TokenGenerationFailed
Error message:
The target resource is invalid because it doesn’t exist, Azure AD can’t find it, or it’s not correctly configured in the tenant.
This indicates that Microsoft Teams could not obtain an OAuth token for the Exchange endpoint.
Another error returned by the test is:
- HTTP Status:
400 - Error Code:
ErrorNonExistentMailbox - Error Message:
Mailbox doesn't exist
This error does not necessarily mean the on-premises mailbox is missing.
Check the EvoSTS AuthServer, Exchange HTTPS SPNs, and mailbox discovery results. Confirm that the SPNs are registered on the correct Exchange Online service principal.
5.2 Teams Calendar: CalendarEventsFetchFailed / Unauthorized
The Teams Calendar RCA may report:
CalendarEventsFetchFailed
With the following error:
Error while validating calendar events from EWS. ErrorCode: Unauthorized.
Allow a few minutes for recent configuration changes to take effect, then repeat the test.
If the problem continues, check EWS connectivity and OAuth configuration.
Also distinguish between EWS and REST results. A REST Unauthorized warning may still appear when EWS calendar access is working.
5.3 Teams Meeting Delegation: HTTP 401 / ErrorSubCode 4014
The Teams Meeting Delegation RCA may return:
- HTTP Status:
401 - ErrorSubCode:
4014 - Error: OAuth Trusted Issuer validation failed
The RCA may also report:
The Bearer response header did not contain the expected trusted issuer.
This error can occur for different reasons. Check the following.
1. Verify Calendar Delegate permissions
In the on-premises Exchange Management Shell, run:
Get-MailboxFolderPermission -Identity "delegator@onpremx.cloud:\Calendar"Replace the mailbox address with your delegator’s email address.
Check whether the delegate is listed and has Author or Editor permissions.
If the delegate is missing, open Classic Outlook → File → Account Settings → Delegate Access using the delegator’s account and assign the required permission.
Even if the Calendar folder permission exists, verify the actual Delegate Access configuration in Outlook.
2. Verify WindowsAzureACS
If Delegate permissions are correct, check the AuthServer configuration:
Get-AuthServer | Format-Table Name,Type,EnabledConfirm that WindowsAzureACS exists and is enabled. If it is missing, configure it as described in Section 4.3.
Repeat the Teams Meeting Delegation RCA test after making the required correction.
5.4 Teams Meeting Delegation: HTTP 403 / ErrorSubCode 4014
The Teams Calendar Scheduler may return:
- HTTP Status:
403 - ErrorSubCode:
4014
If the Exchange API check passes but the Scheduler fails, verify:
- TeamsScheduler PartnerApplication and its Application ID.
- Linked MailUser and its RBAC role assignment.
- The seven required management role entries.
- Exchange Online PartnerApplication is enabled.
- Calendar Delegate permissions.
After correcting the configuration, allow a few minutes and repeat the RCA test before making further changes.
6. Key Takeaways
- HCW is not required for the Teams Calendar integration described in this article. The necessary components can be configured manually.
- Basic Teams Calendar integration works with the appropriate EvoSTS OAuth configuration, Exchange SPNs, and accessible Autodiscover and EWS endpoints.
- Teams Meeting Delegation requires additional configuration, including the Teams Calendar Scheduler PartnerApplication, restricted RBAC permissions, OAuth components, and Calendar Delegate permissions.
- RCA error codes alone may not identify the root cause. The same
401/4014error appeared with different configuration issues. Always review the individual RCA test results before making changes.
With this configuration, users can access their on-premises Exchange calendars in Microsoft Teams and schedule Teams meetings on behalf of other users without running the Hybrid Configuration Wizard.
References
- How Exchange and Microsoft Teams interact
- Configure OAuth authentication between Exchange and Exchange Online organizations
- Configure Integration and OAuth between Microsoft Teams services and Exchange Server

Cloud and infrastructure professional with nearly two decades of experience in enterprise IT environments, spanning public cloud, private cloud, and hybrid architectures.