Applies to: Windows Server 2003 / VMware Workstation 7.x / 6.x / legacy StarWind iSCSI Target
Historical: This article documents an older shared-storage clustering setup using Windows Server 2003 virtual machines, VMware Workstation, Microsoft iSCSI Initiator, and the legacy StarWind iSCSI Target interface.
The exact StarWind screens and Windows Server clustering workflow shown here are no longer current, but the underlying storage model is still useful: both cluster nodes connect to the same shared iSCSI LUNs, which are then presented to Windows Failover Clustering.
In This Article
- 1. Original Design
- 2. Configure StarWind Storage
- 3. Configure the Networks
- 4. Connect the First Cluster Node
- 5. Connect the Second Cluster Node
- 6. Current Windows Server Guidance
- 7. Key Takeaways
1. Original Design
The original setup used three components:
- iSCSI target: StarWind running on the VMware Workstation host.
- iSCSI initiators: Microsoft iSCSI Initiator inside both Windows Server 2003 cluster nodes.
- Network: Dedicated virtual networking between the cluster nodes and the iSCSI target.
Two shared disks were created: one for the cluster quorum and one for application or data storage.
2. Configure StarWind Storage
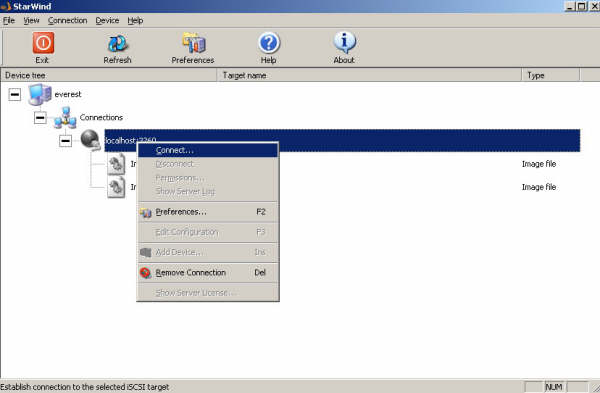
In the legacy StarWind management console, create image-file devices for the shared disks and enable the clustering or multi-initiator option so that both Windows cluster nodes can connect to the same LUNs.

3. Configure the Networks
The original VMware Workstation setup used three separate virtual networks:
- Public: Bridged network for normal server communication.
- Heartbeat: A private/custom virtual network between the two cluster nodes.
- iSCSI: A host-only network used only for storage traffic between the guests and StarWind.
Keeping iSCSI traffic on a dedicated network remains a good design principle for shared-storage clusters.
4. Connect the First Cluster Node
- Install or enable Microsoft iSCSI Initiator.
- Add the StarWind target portal.
- Connect to the shared targets.
- Enable automatic reconnection at startup.
- Open Disk Management and initialize the shared disks from the first node.
- Create the required partitions and assign drive letters.

5. Connect the Second Cluster Node
After preparing the shared disks on the first node, connect the second cluster node to the same iSCSI targets. Do not reformat or reinitialize the shared disks from the second node.

6. Current Windows Server Guidance
For current Windows Server failover clusters, the storage technology can still be iSCSI, but the configuration should follow current Windows Server and storage-vendor guidance.
- Use dedicated network adapters or networks for iSCSI storage traffic.
- Use supported multipathing where the storage design requires redundant paths.
- Present the same shared LUNs consistently to all cluster nodes.
- Run the complete cluster validation suite before creating the cluster.
Test-Cluster -Node NODE1,NODE2Current StarWind deployments use StarWind Virtual SAN rather than the legacy iSCSI Target interface shown in this article. StarWind’s current Windows Server guides still use Microsoft iSCSI Initiator to discover and connect shared storage before creating the failover cluster.
7. Key Takeaways
- This article documents a Windows Server 2003 and VMware Workstation-era clustering setup.
- The original StarWind interface and Microsoft clustering screens are historical.
- The core iSCSI model remains the same: shared targets are presented to all cluster nodes.
- Use a dedicated iSCSI network and validate the complete cluster configuration.
- For current deployments, follow current StarWind VSAN and Windows Server Failover Clustering documentation rather than reproducing the legacy steps exactly.
References
- Microsoft Learn – Failover clustering hardware requirements and storage options
- StarWind – Windows Server Failover Cluster with StarWind VSAN

Cloud and infrastructure professional with nearly two decades of experience in enterprise IT environments, spanning public cloud, private cloud, and hybrid architectures.